Easy Completly Free Way to Make a Website
Last updated: August 10, 2022
Creating a website from scratch isn't as difficult as you might think.
Why?
About ten years ago, website building was still pretty much in its infancy. Nowadays, even a complete beginner can learn how to create a website without any basic computer skills.
Whether you're a tech-savvy person or a novice, this guide will help you get started and build your own website.
I have also covered the most common mistakes people make when building a website, so you can avoid them.
If you ever get stuck setting up your website, don't hesitate to contact me.
Full disclosure: I'm partnered with some of the tools and services that are listed on this page. I've used most of them for my own purposes. This helps me to provide free help via email and keep this guide up to date.
Step 1: Register a Domain Name
(If you already own a domain name, you can skip this step and move to Step 2.)
First things first: every website needs a name.
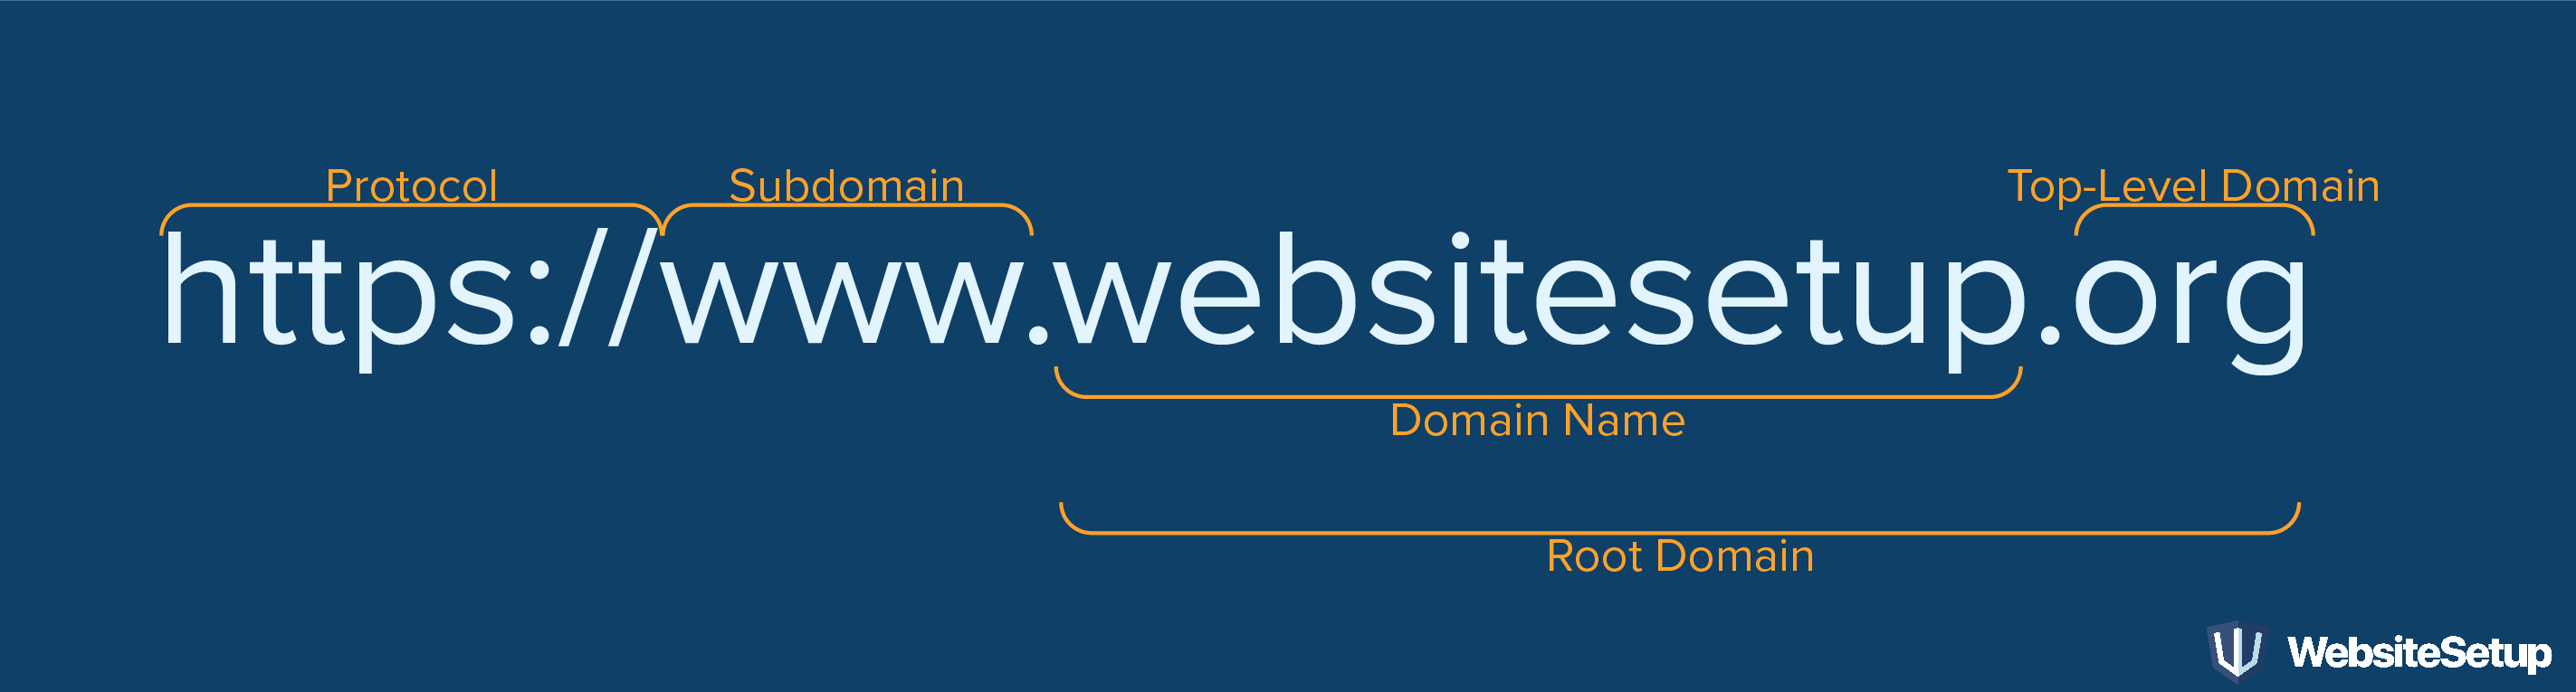
Without a name (also known as a domain name), your website simply cannot function. Think of it as a street address for a house, where the address is the domain name and the house is your website.
By owning a domain name, you'll always have full control over your website, no matter what happens. Domains cost around $10/year and renew automatically until you decide to cancel.
When choosing a domain name, there are a few rules you should keep in mind:
- If you're setting up abusiness website, your domain name should match your company name, for example, YourCompanyName.com
- If you're planning on making apersonal website for yourself, thenYourName.com is always a great option
- Don't dwell too much. Most of the best and unique domain names were bought up decades ago. Go with something that matches your website.
When registering a domain name, which domain extension should you use (.com, .org, .net)?
There are hundreds of different domain name extensions (TLDs).
The most common ones are .com, .net, and .org.These domain extensions are best suited for websites that want to get visitors globally (not just locally). For this site (WebsiteSetup), I chose WebsiteSetup.org, since .com was unavailable. You can get a .com, .org, or .net domain name from Domain.com.
However, if your goal is to only target customers in your local country, for example, in the UK, Canada, or Germany, go with the local extensions like co.uk, .ca, or.de.You can get local domain extensions through GoDaddy.
Whichever domain provider you use to register your domain name, make sure they're accredited by the ICANN.
The domain registration process is quite simple. It takes less than five minutes to buy the domain and complete the registration, but it's an important investment in your website early on.
Step 2: Choose a Website Building Platform
Your next step is to pick a platform that your website will be built on.
However, there are hundreds of different tools (and ways) to build a website. And the first mistake that most people often make is they pick the wrong platform to create their site.
If you choose a platform that isn't good or flexible enough, you'll need to start all over again with another platform. It's doable, but not recommended (since it's a waste of your time and money).
In order to help make your decision easier, I've compiled the statistics (1, 2, 3) to show how websites are being built. Take a look at this graph below:
How websites are being built in 2022
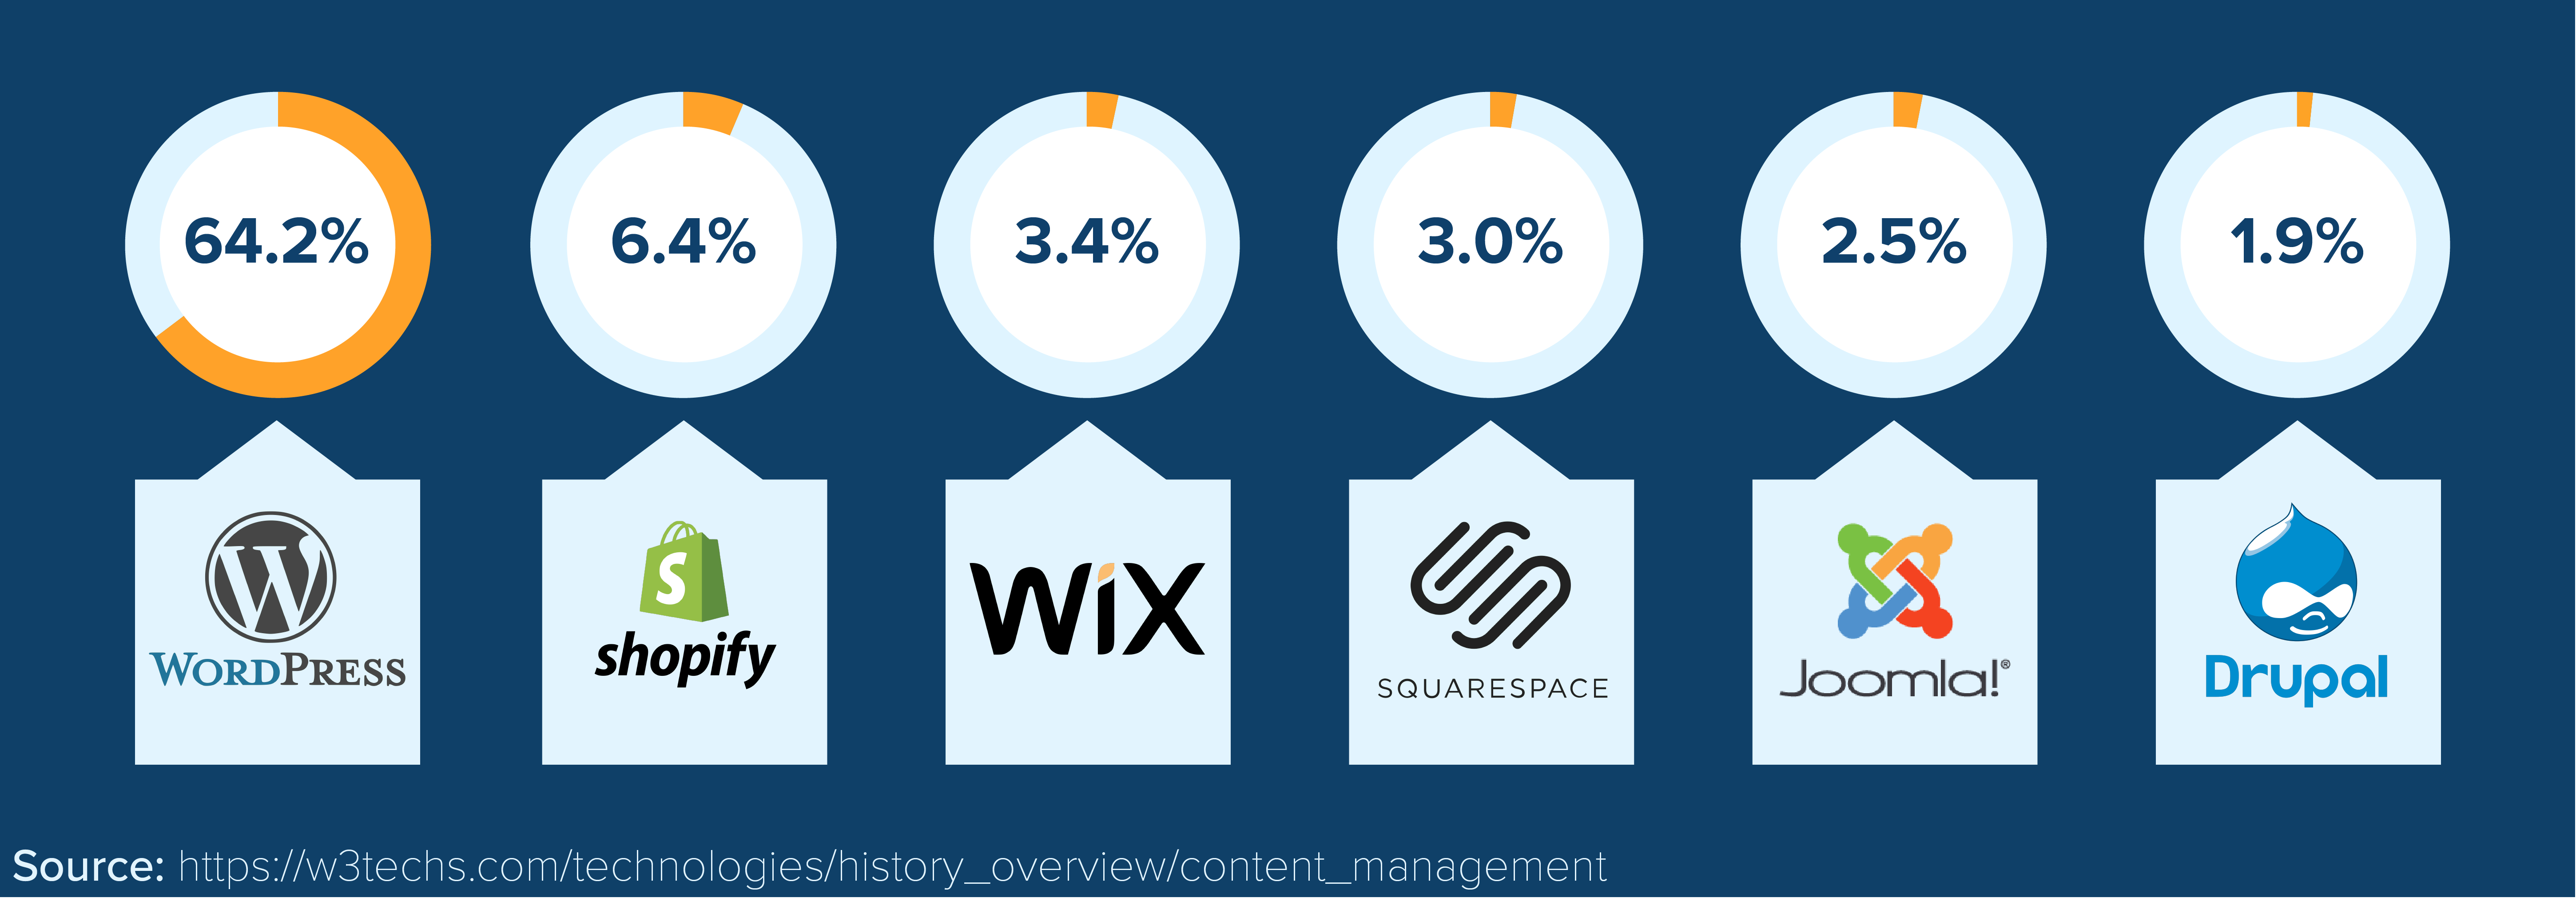
This data shows the market share percentage of 200+ different website building platforms (known as website builders and content management systems).
Two website building tools, Shopify and WordPress, are the most commonly used.
And they're the most popular for a reason.
WordPress is the most flexible (free) tool to build any kind of website, from small to large, and it's suitable for beginners.
Shopify offers a website building service to create your own website and online store. This is ideal for smaller brands, businesses, and individuals who need a simpler site.
The other ones aren't bad either, but since I've used them all, I know that I'd still use WordPress or Shopify over any of the others.
Step 3: Start Building Your Website
Now for the exciting part.
In the next hour or so, you'll have a fully working website on your own domain. Do not skip any steps, otherwise, your website might not function as it should.
Remember: I'm here to help. If you have any questions about the guides or simply need some help, don't hesitate to reach out. I'll do my best to support you.
Setting Up a Website
I've made two different guides on creating a website. If you are unsure, go with web hosting + WordPress as it's cheaper and more flexible.
However, if your goal is to build an online store, Shopify is a better solution.
To get started with setting up a website with WordPress, you first need to sign up with a preferred web hosting provider. Luckily, almost all well-established and reliable web hosting companies have integrated one-click installation for WordPress, so it's made it very easy for you.
These are the steps you need to follow to install WordPress through web hosting service:
Step 1. Choose a web hosting service
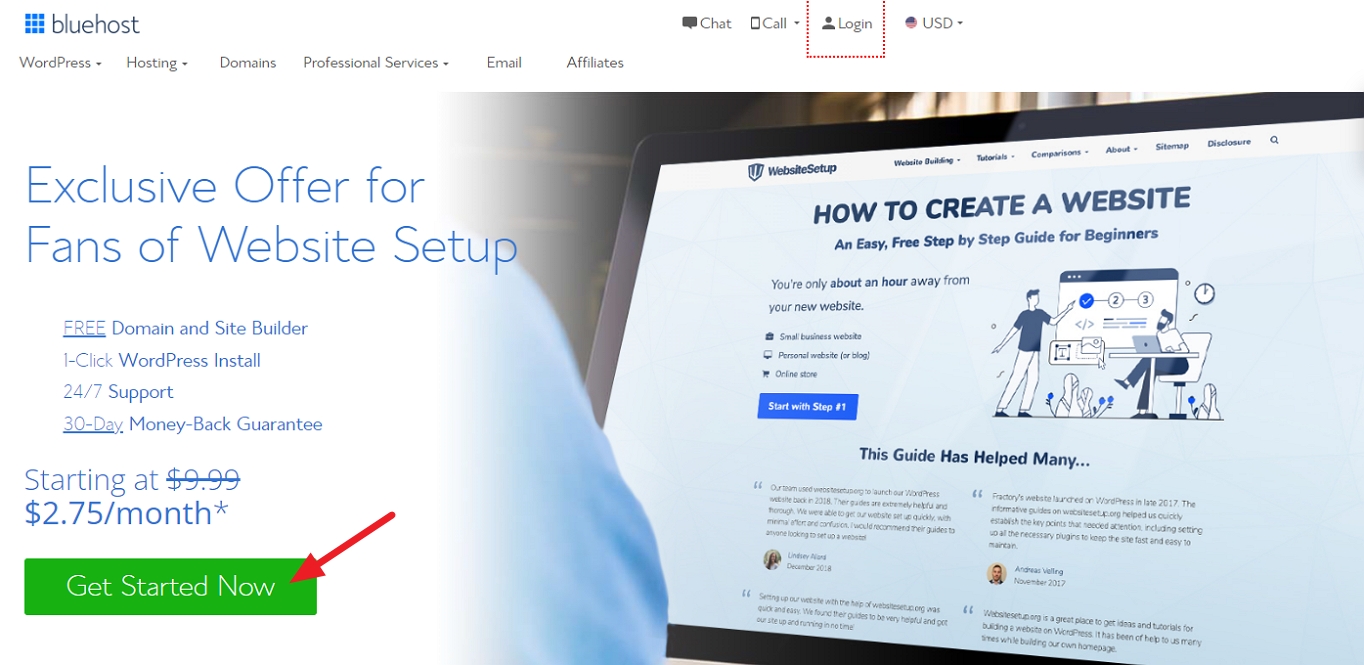
In this example, I'll be using Bluehost. But you can also use Dreamhost which is slightly cheaper.
Once you arrive at their homepage, click "Get Started Now". After you've done that, you'll be redirected to their hosting plans page.
Step 2. Choose a hosting plan
Bluehost offers three shared hosting plans. For this guide, we'll opt for the "Basic" shared hosting plan. The basic plan is a good choice if you're just starting out and don't yet have a large volume of inbound traffic to your website.

Click "Select" when you're done.
Note:you can always upgrade your plan later if you need to.
Step 3. Set up your domain name
The next step is to connect your domain name with Bluehost, or you can also register your new domain name directly with them. If you're not sure about the domain name yet, there's an option to skip this step.
If you need additional help connecting your domain name with Bluehost, you can follow their detailed article on how to do so.
In this example, I registered a new domain called myremarkablesite.com.

Once you're done, click "Next".
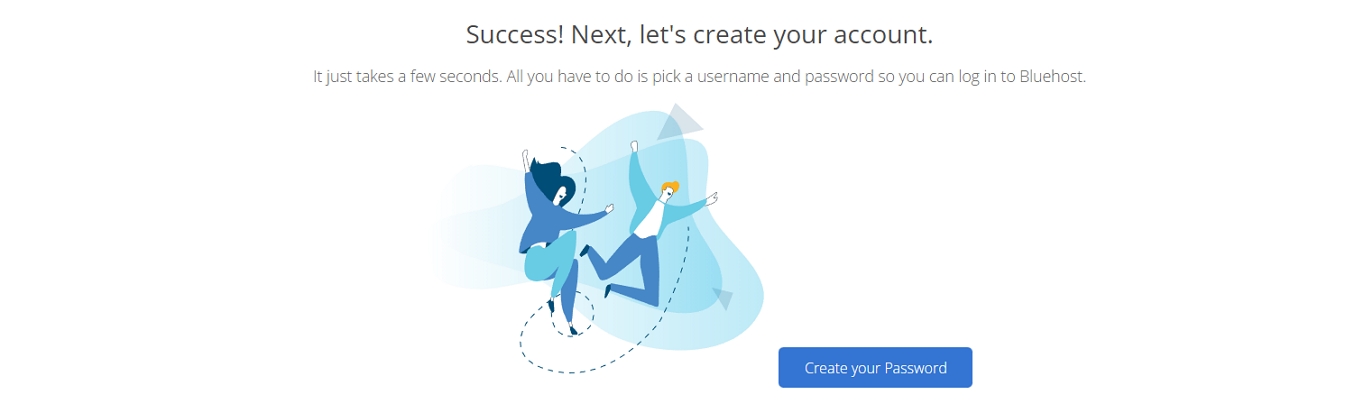
Step 4. Create your account and check your package information
Simply fill out all the required information, such as your first and last name, address, email, and so on.

When you scroll down, check your package information and the add-ons that are included. Remember to select only those that you need.
Before you enter your payment information, double-check all the above criteria, and if everything is correct, click "Submit".
And you're done!
Now create your account user and log in to your client area so I can show you how to install WordPress.
 Step 5. Install WordPress
After you've logged in to your Bluehost account, you should see the following page:
All you have to do is click on the "Create your website" button.
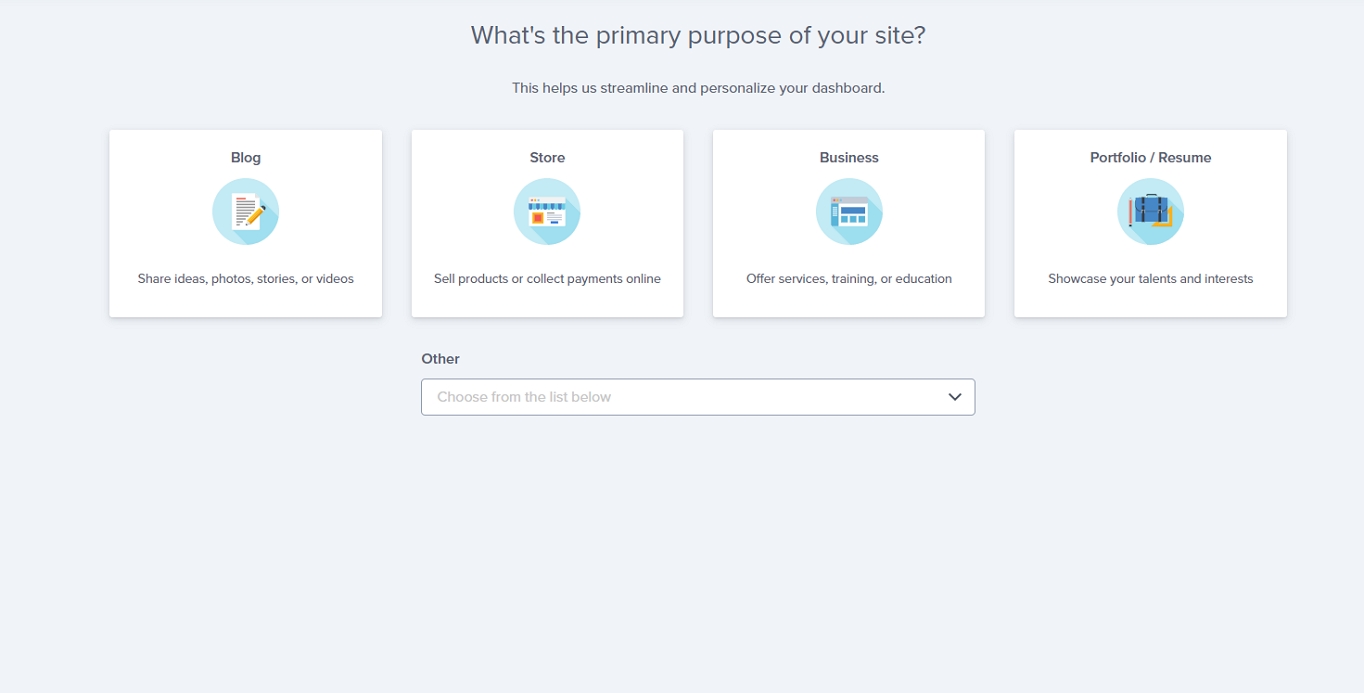
The next step is to decide the purpose of your site. You can choose between Blog, Store, Business, or Portfolio/Resume. If any of those don't quite fit, you can select an option in the "Other" dropdown list.
Next up is to choose how you'd like to build your WordPress site. Bluehost gives you an option to choose between Bluehost and WordPress.
Since I want to focus on theme-based site building, I chose the latter.
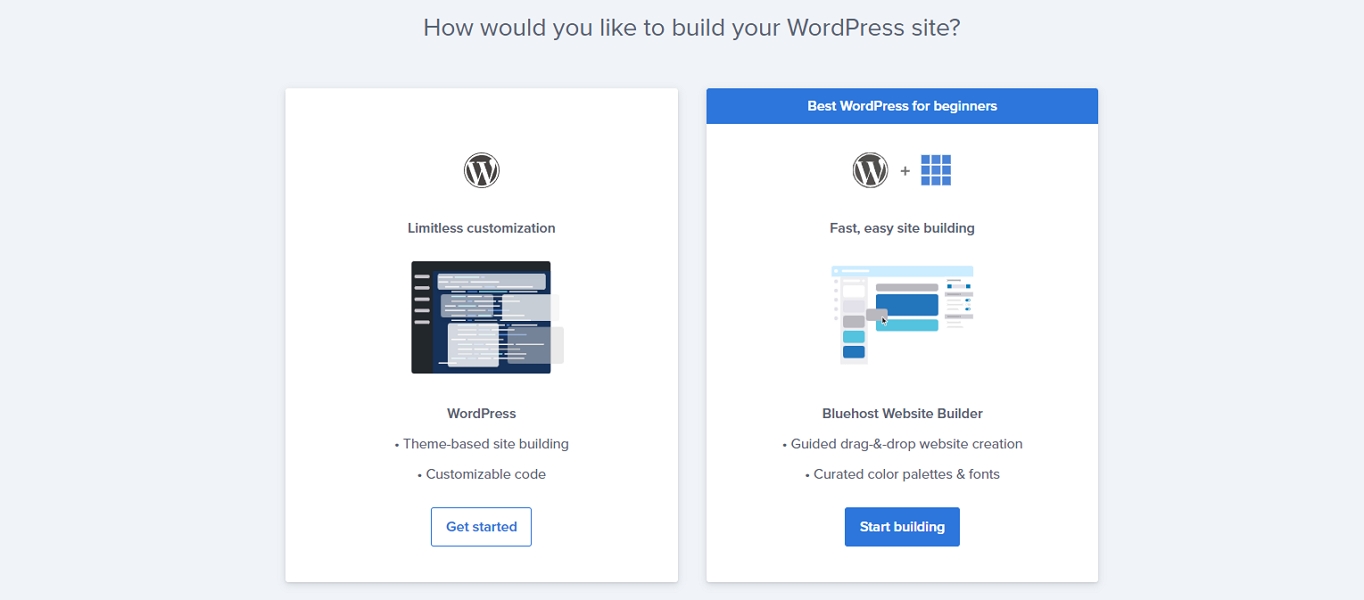
Click "Get started" and let's move on to the next step.
Step 6. Start customizing your WordPress site
Before we can get down into the nitty-gritty, Bluehost will ask you what type your website is, and once confirmed, it'll suggest a few plugins and extensions.

In my example, I categorized my blog as "Education". Once you're done with your decision, click "Continue".
Of course, you can also skip this step.
Step 7. Pick your theme
Now is the time to pick your theme. Bluehost will give you a bunch of free and premium themes to choose from. Moreover, you can sort the themes by popularity, category, features, and layouts.

Once you've found your preferred theme, hover over the option and click on "Use This Theme". In my example, I'll be using the theme "Twenty Twenty-One".
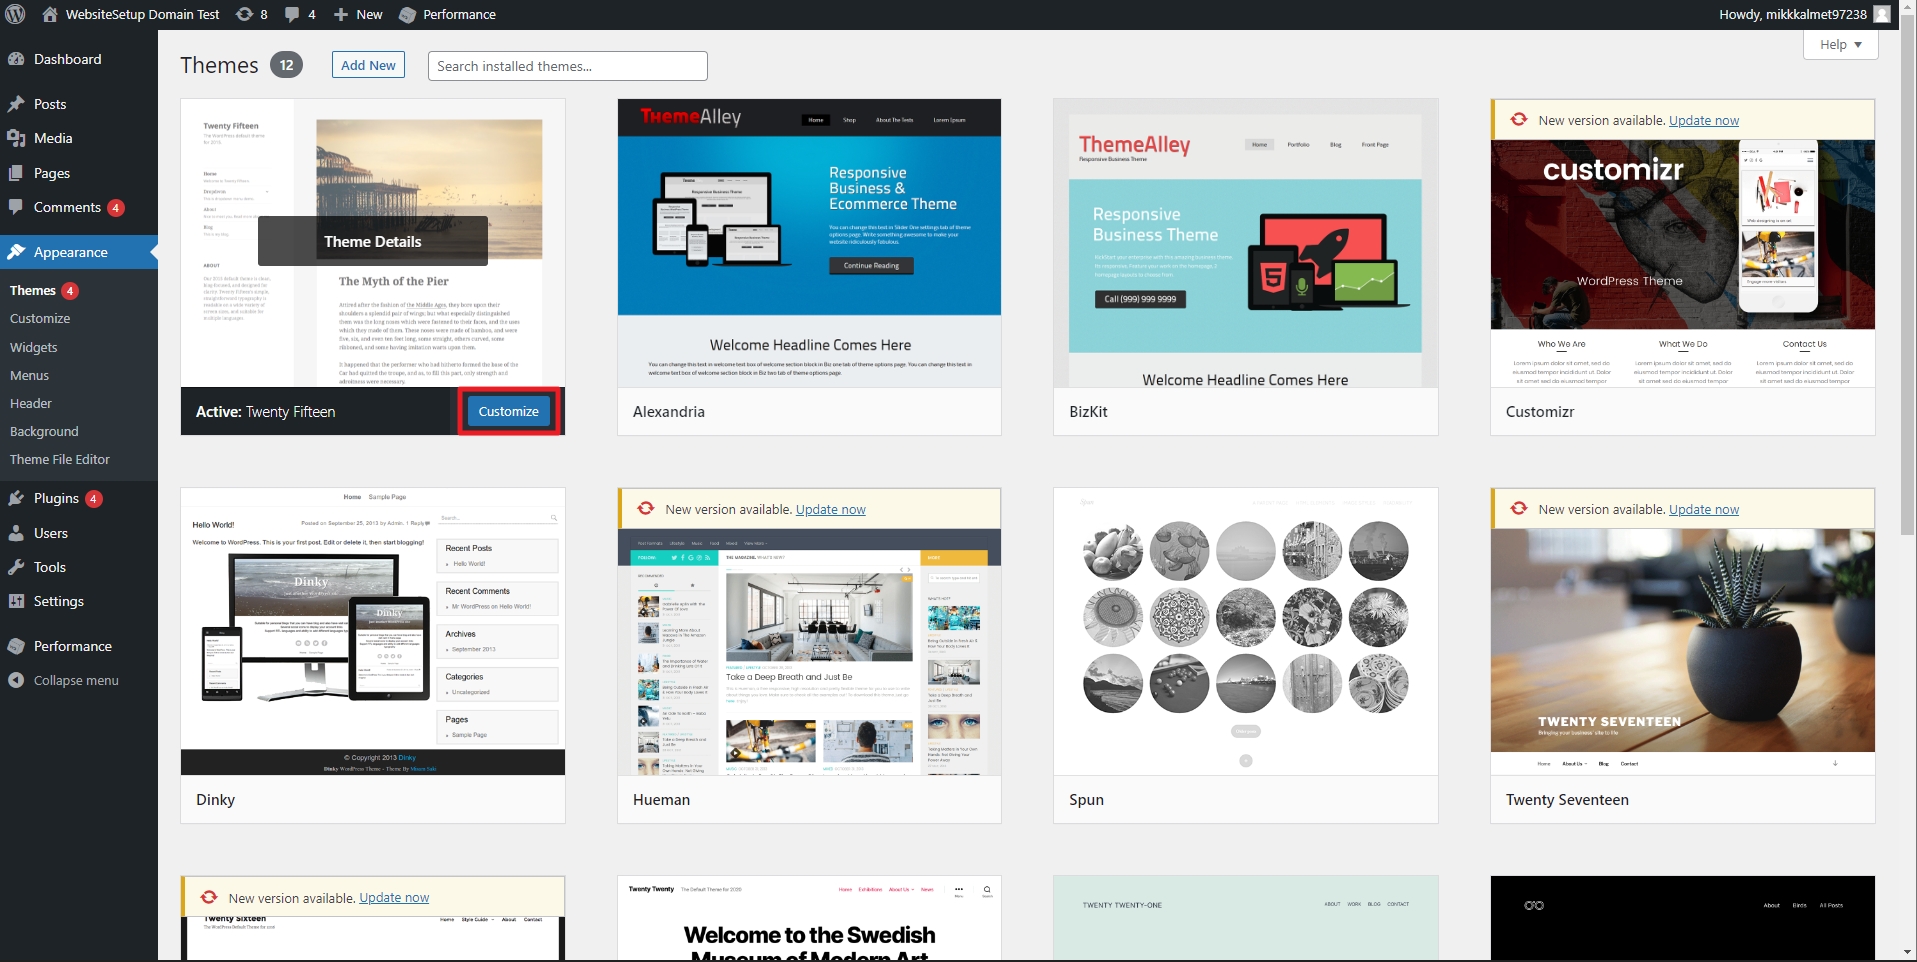
Note: if you change your mind, you can always modify your theme later on. To do that, log in to your WordPress dashboard and navigate to Appearance > Themes. From there you can browse a whole host of themes or even upload your own custom theme.
Step 8. Customize your design
After you clicked on "Use This Theme", you should now see the following page:

This is your Bluehost client area, and from there you can log in to your WordPress dashboard and also update or add plugins.
Note: you can also modify and install plugins from your WordPress dashboard under the tab "Plugins".
However, right now, what's important for us is to start customizing the new WordPress site.
For that, all you need to do is click on the "Customize site" button, and you'll be redirected to the editor page:
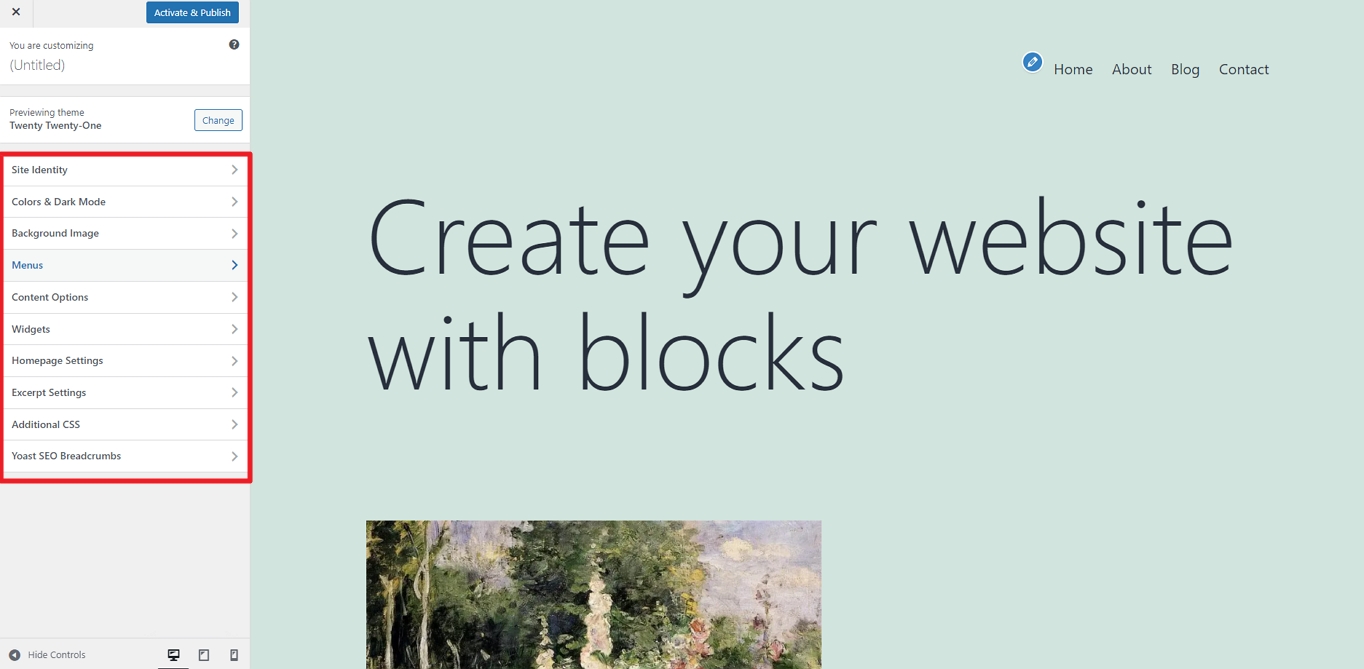
On the left sidebar, you'll see the options that will allow you to modify your website's design, such as:
- Title and tagline
- Site logo
- Fonts
- Colors
- Widgets
- Background image, etc.
Note: the options that appear will vary depending on which theme you've installed.
You also have the option to add CSS (Cascading Style Sheets) to your site to make it even more unique.
I recommend playing around with the editor and testing different fonts and color schemes to get a sense of how you want your site to look.
Once you've tweaked your site's design to perfection, it's time to move on to pages and content.
A great alternative to WordPress, especially when it comes to e-commerce, is Shopify. Shopify is the second most popular CMS on the market, and for good reason. It's intuitive and has a ton of flexibility and options to cater to any online store's needs.
Here is a step-by-step rundown on how to get started with Shopify:
Step 1. Go to Shopify.com
Shopify offers a 14-day free trial, which means you can test their full online store builder out without even needing to add a payment method. The only limitation with the trial is that you can't have or connect a custom domain name. Instead, for the trial period, it will default to YOURSTORENAME.myshopify.com.
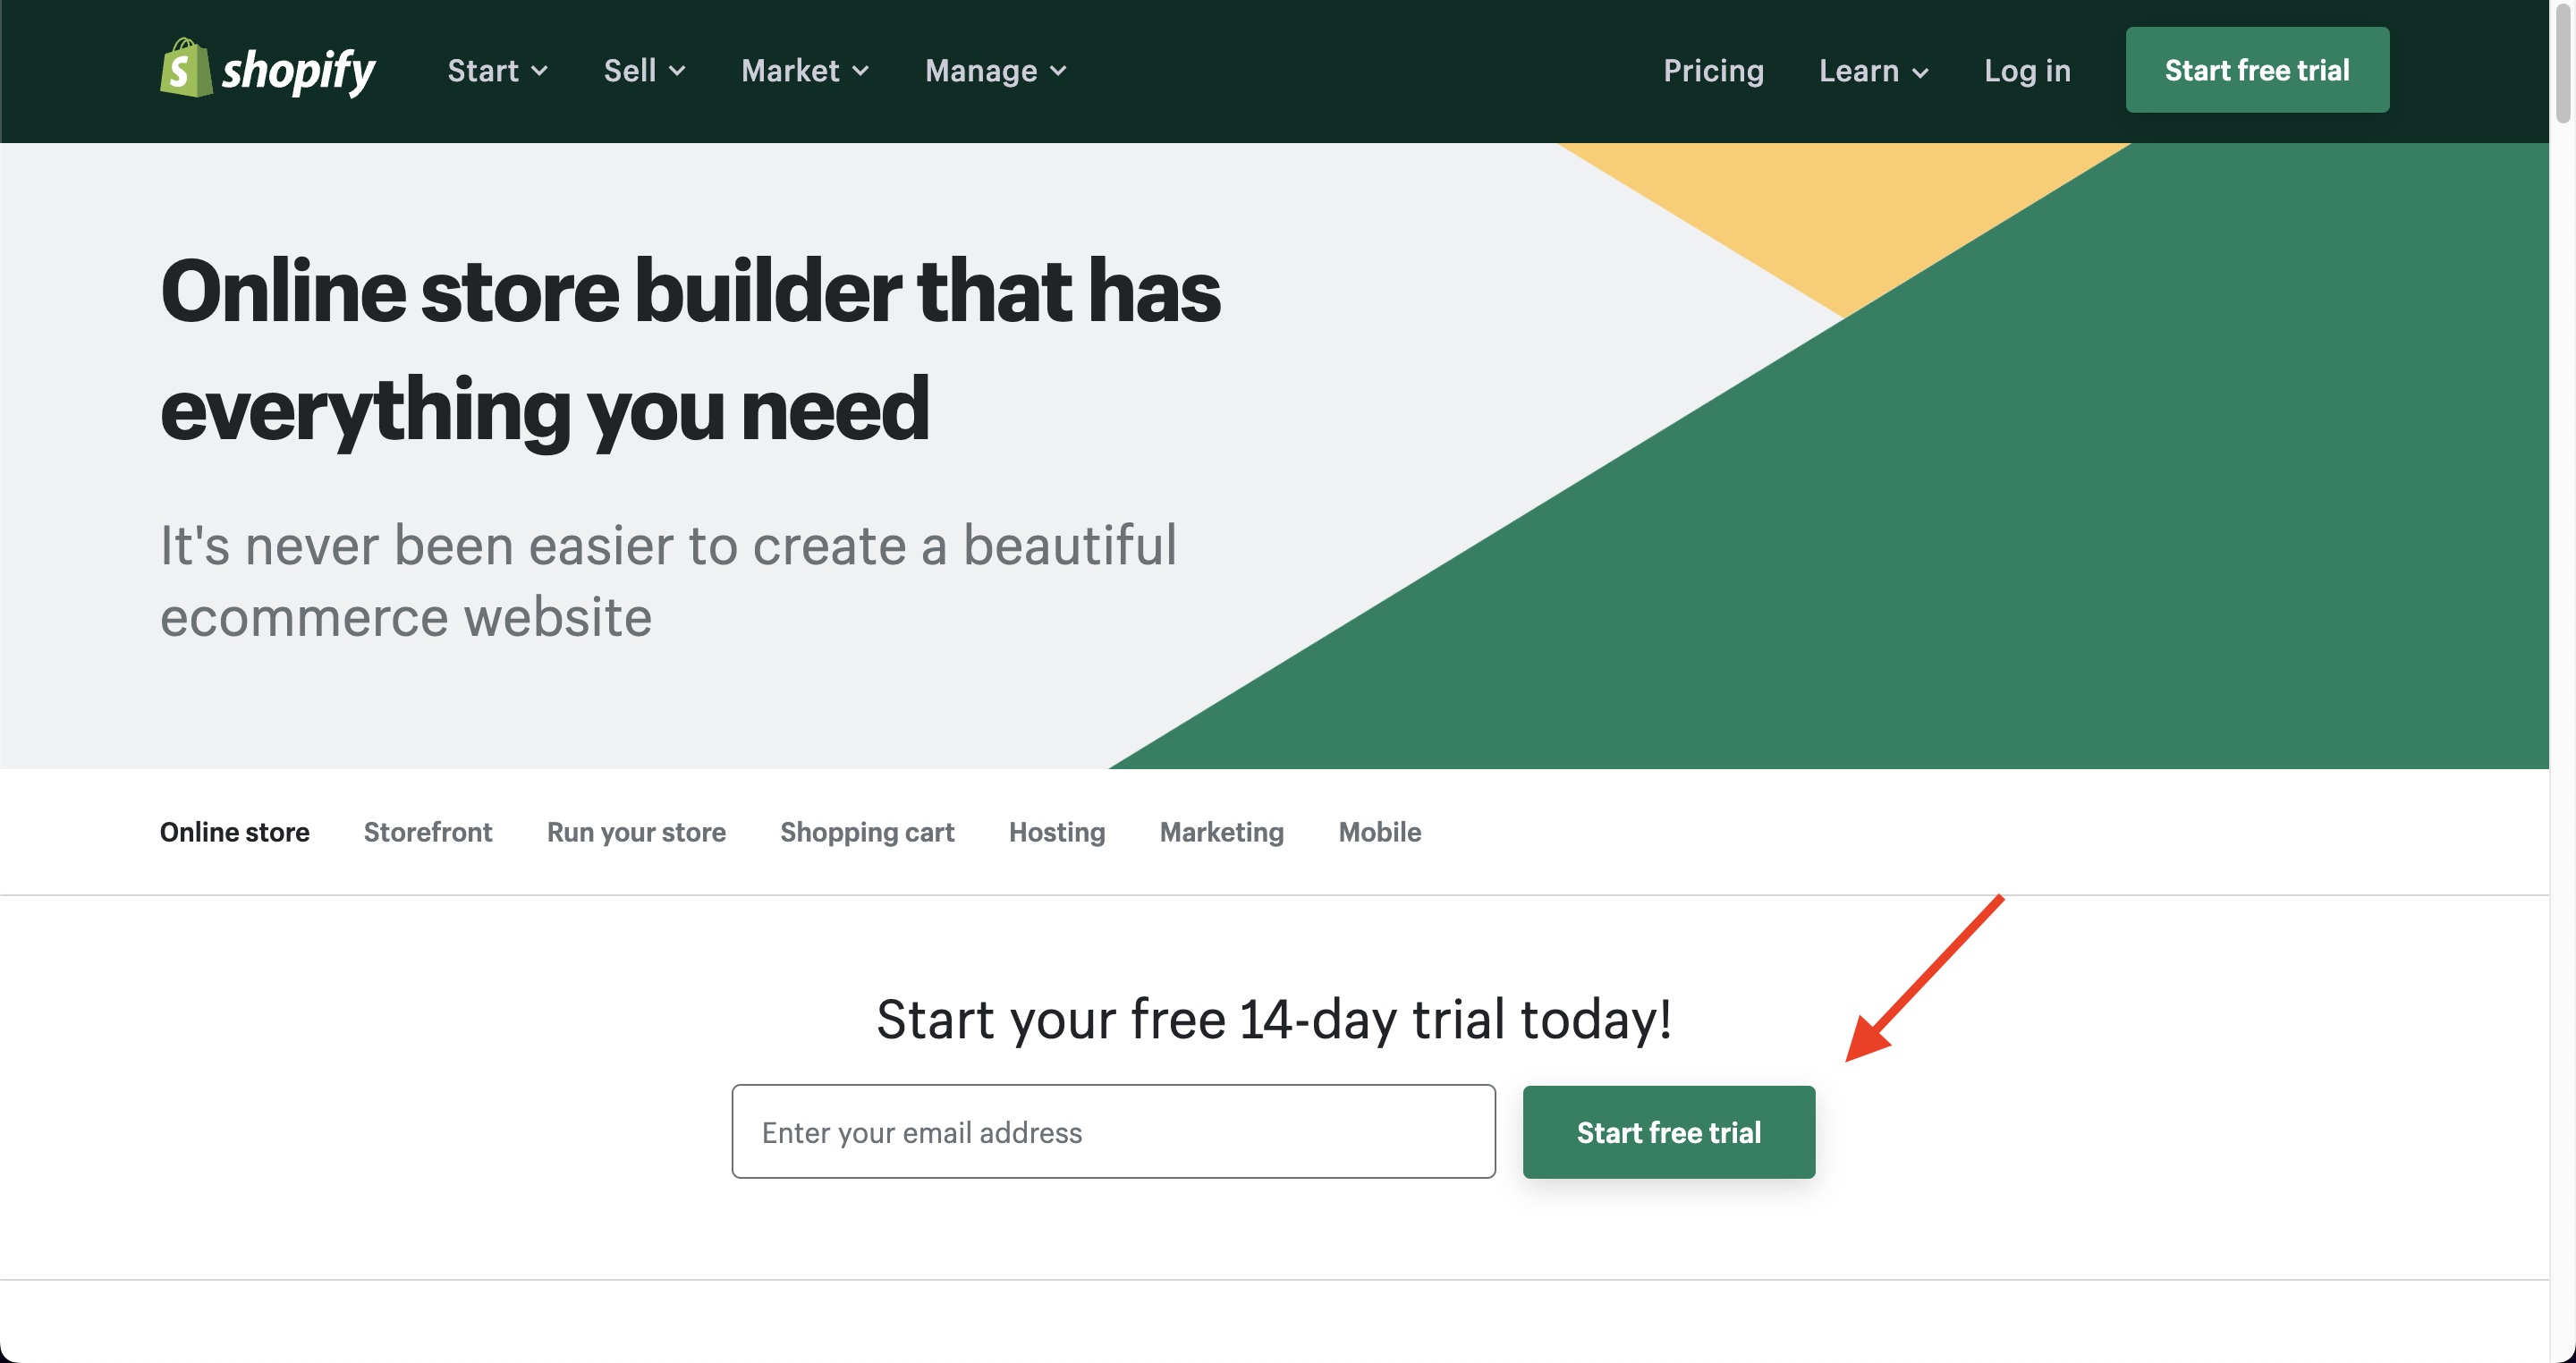
Fill in your email address, a secure password, and your store name. For the name, you can enter a temporary one if you're still undecided. You can change your store's name at any time.
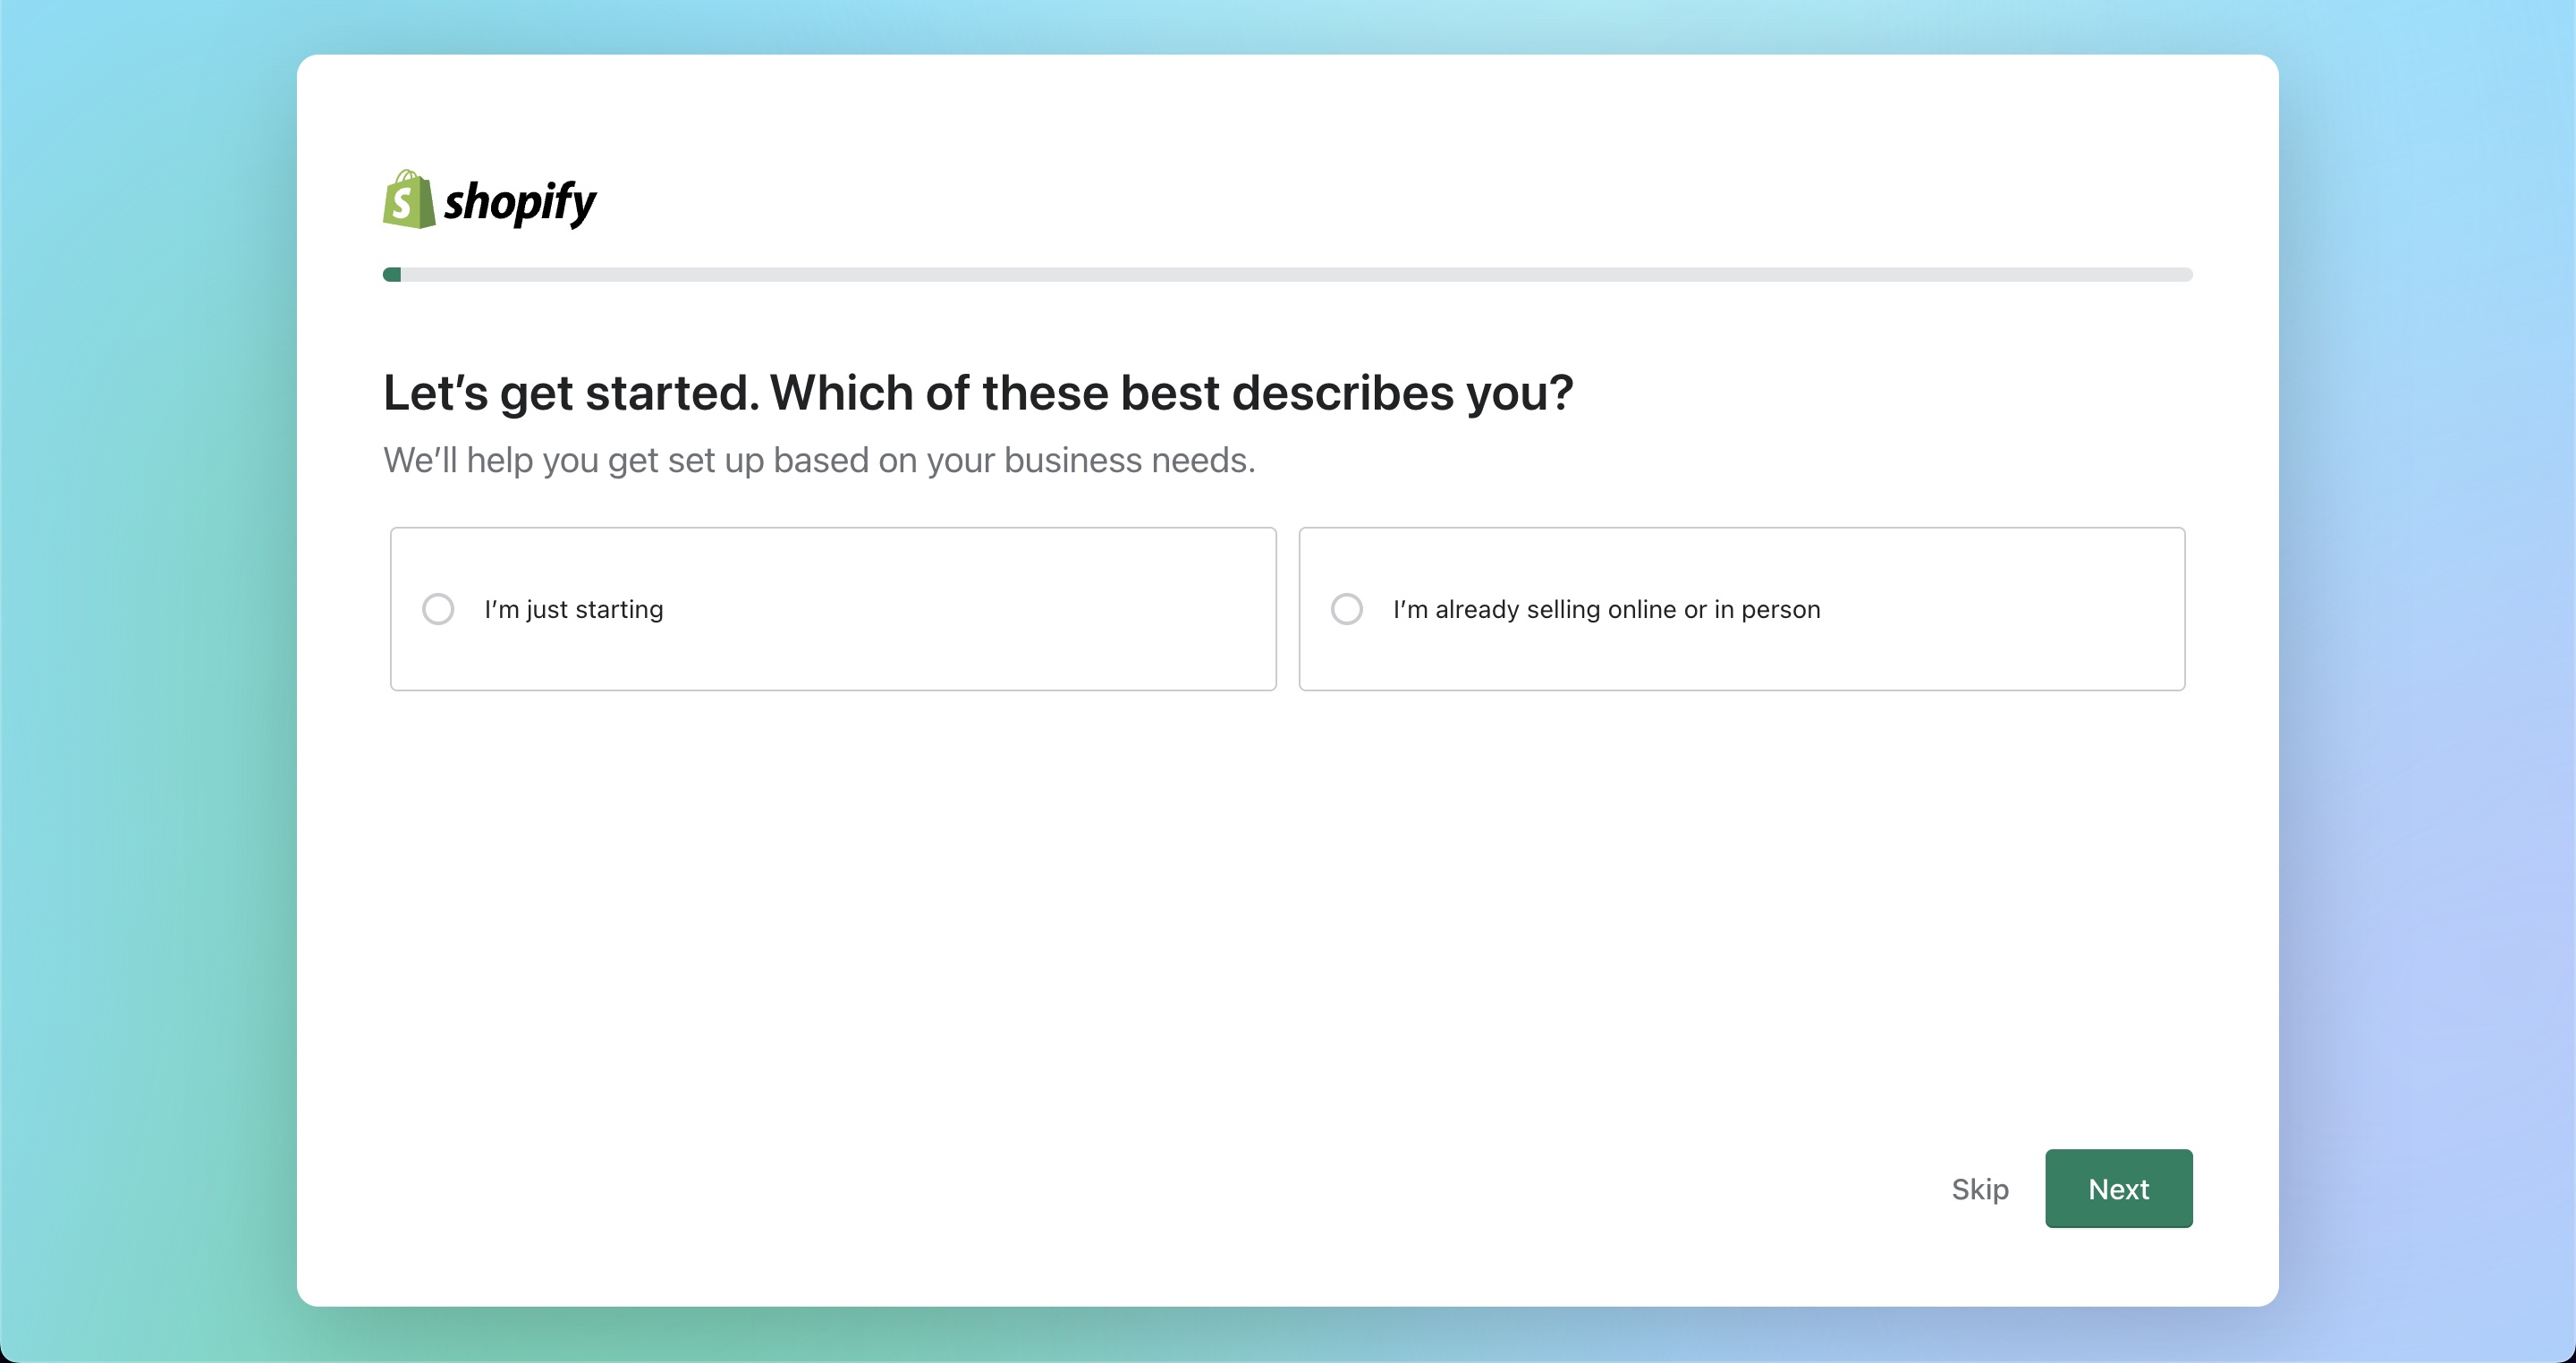
Step 2. Fill in their questionnaire
To make the store set-up process easier, you need to complete a quick questionnaire. The questions are quick and easy, and whatever you choose now can be changed later on if you're unsure what to answer.
Once you've completed the quiz you'll be redirected to your online store manager page. At first glance, it may feel a bit overwhelming, but with some practice and guides, you'll quickly learn that it's very intuitive and gives you a lot of freedom and customization options.
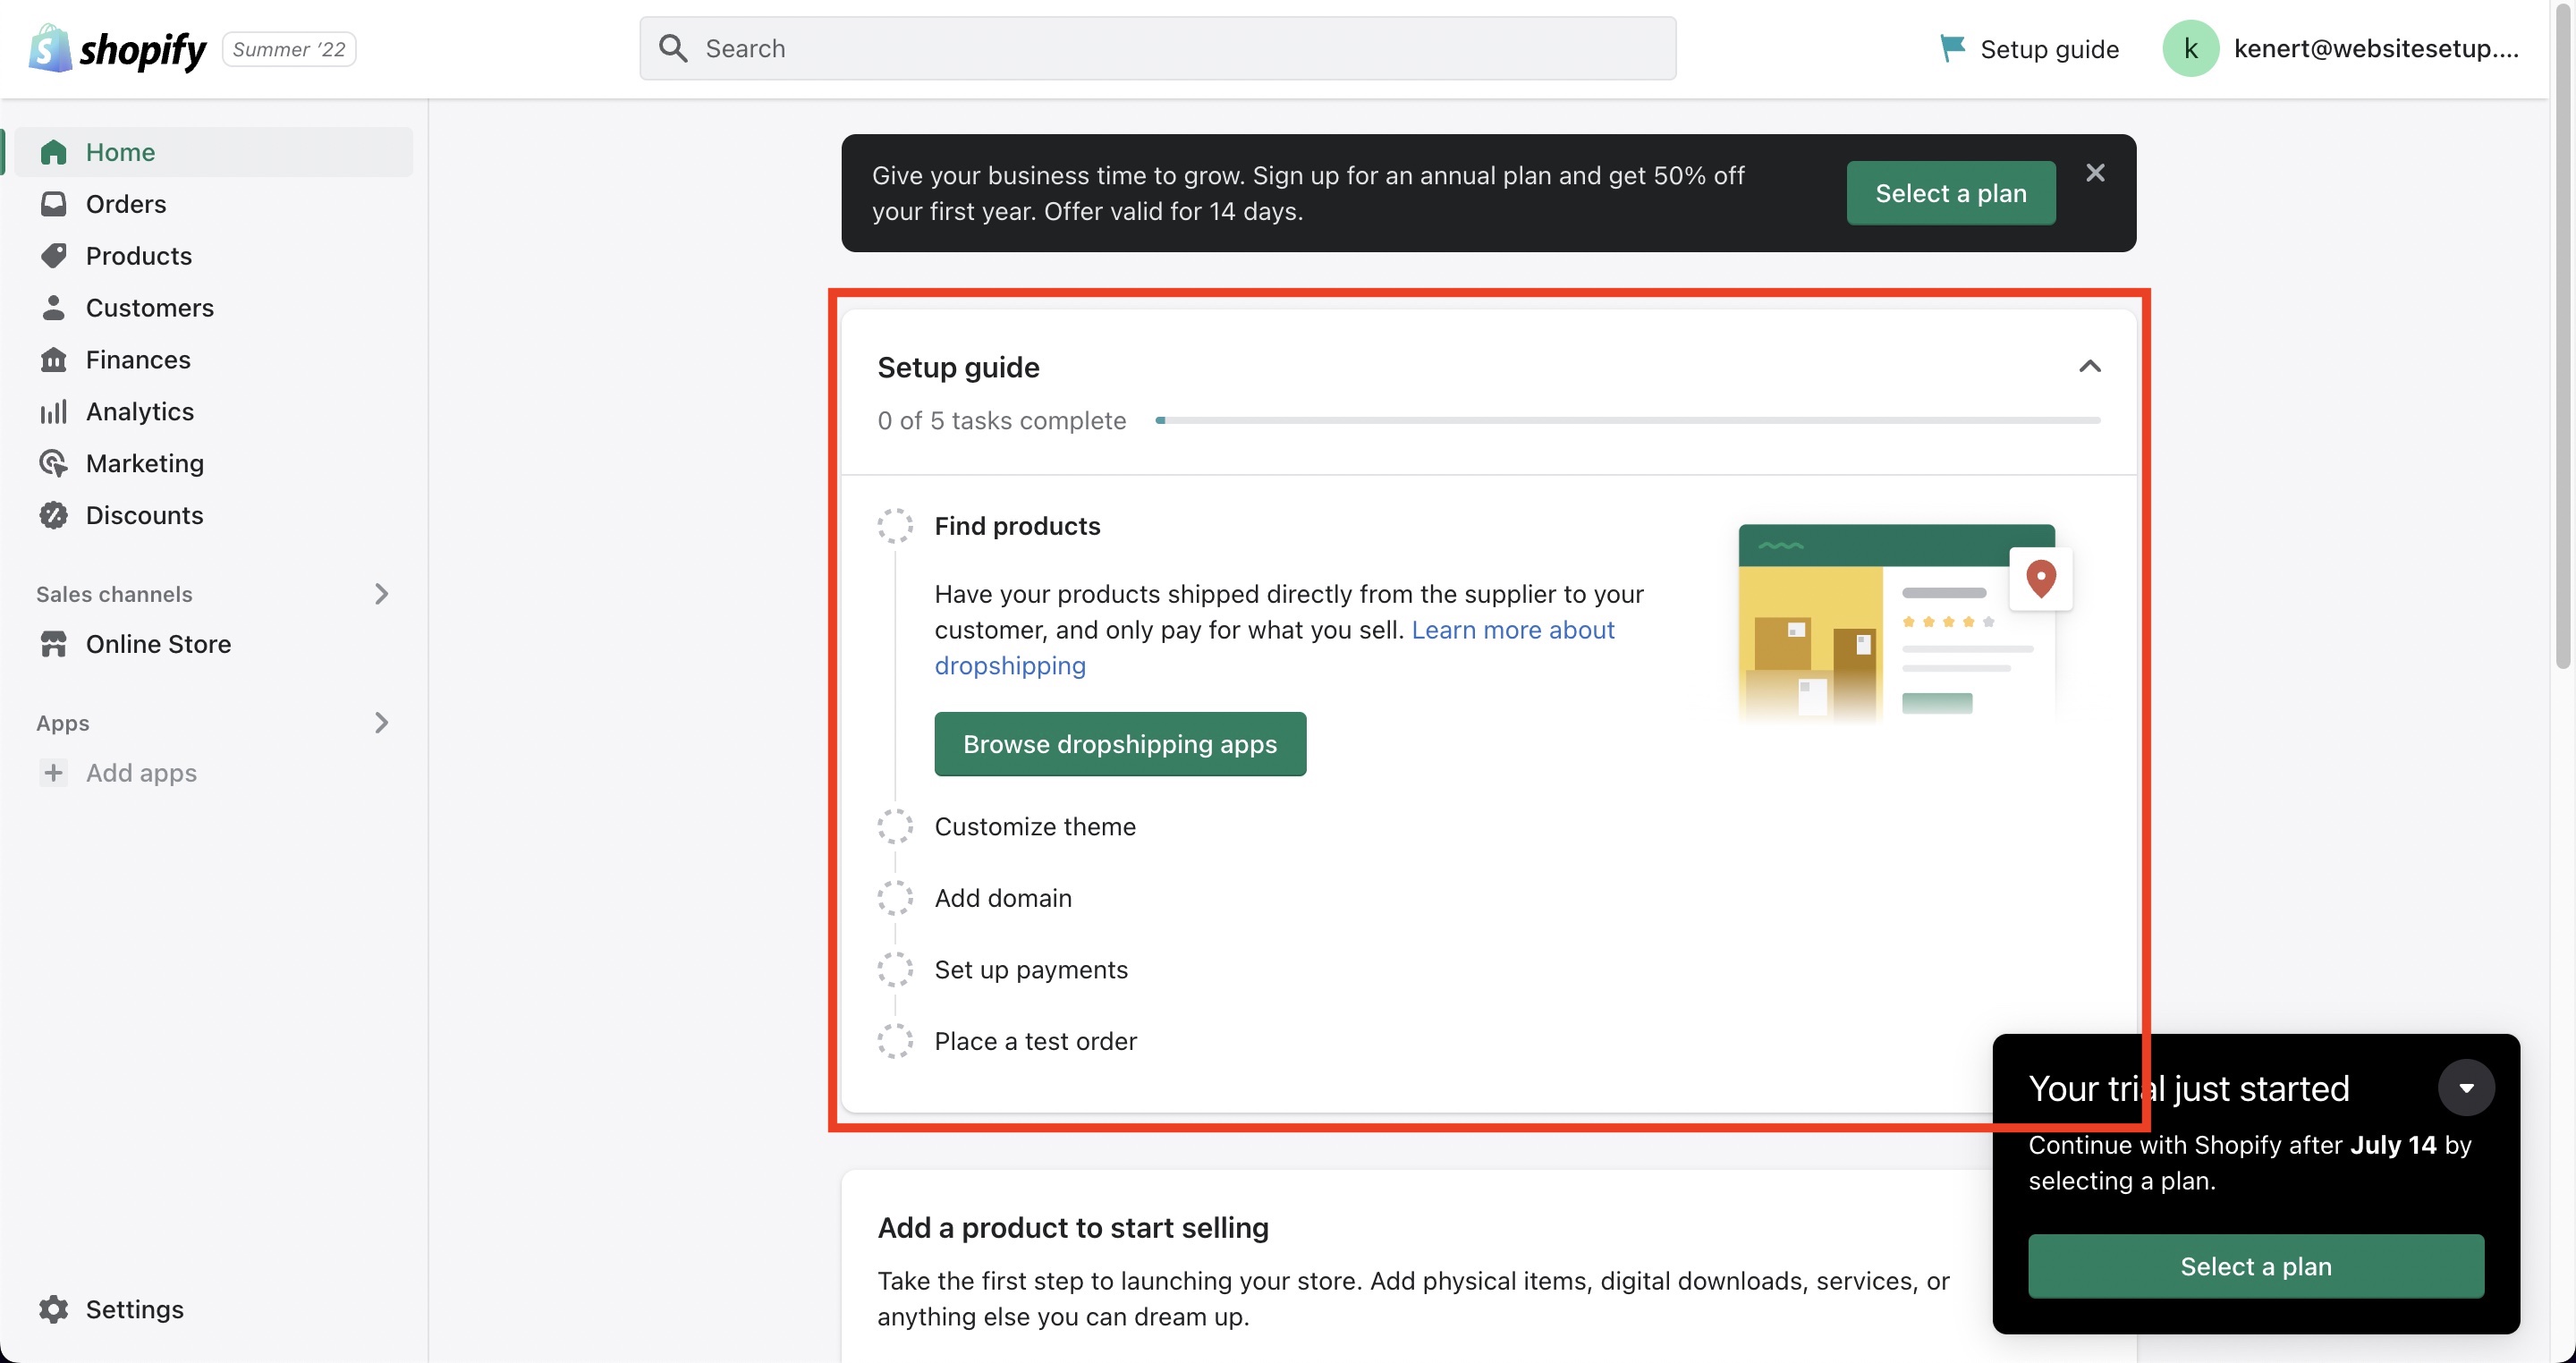
Step 3. Setting up your store
Shopify already has a great step-by-step built-in system to help you set everything up. In order to get your shop started, you need to complete five steps:
- Add products or set up dropshipping
- Customize your theme (store)
- Add a domain name
- Set up your payment options and information
- Test out your store.
Adding Products
If you don't want to use dropshipping, then on the left-hand menu, navigate to the "Products" section. Over there, you can either add your own products to sell or even find third-party products that you can resell.
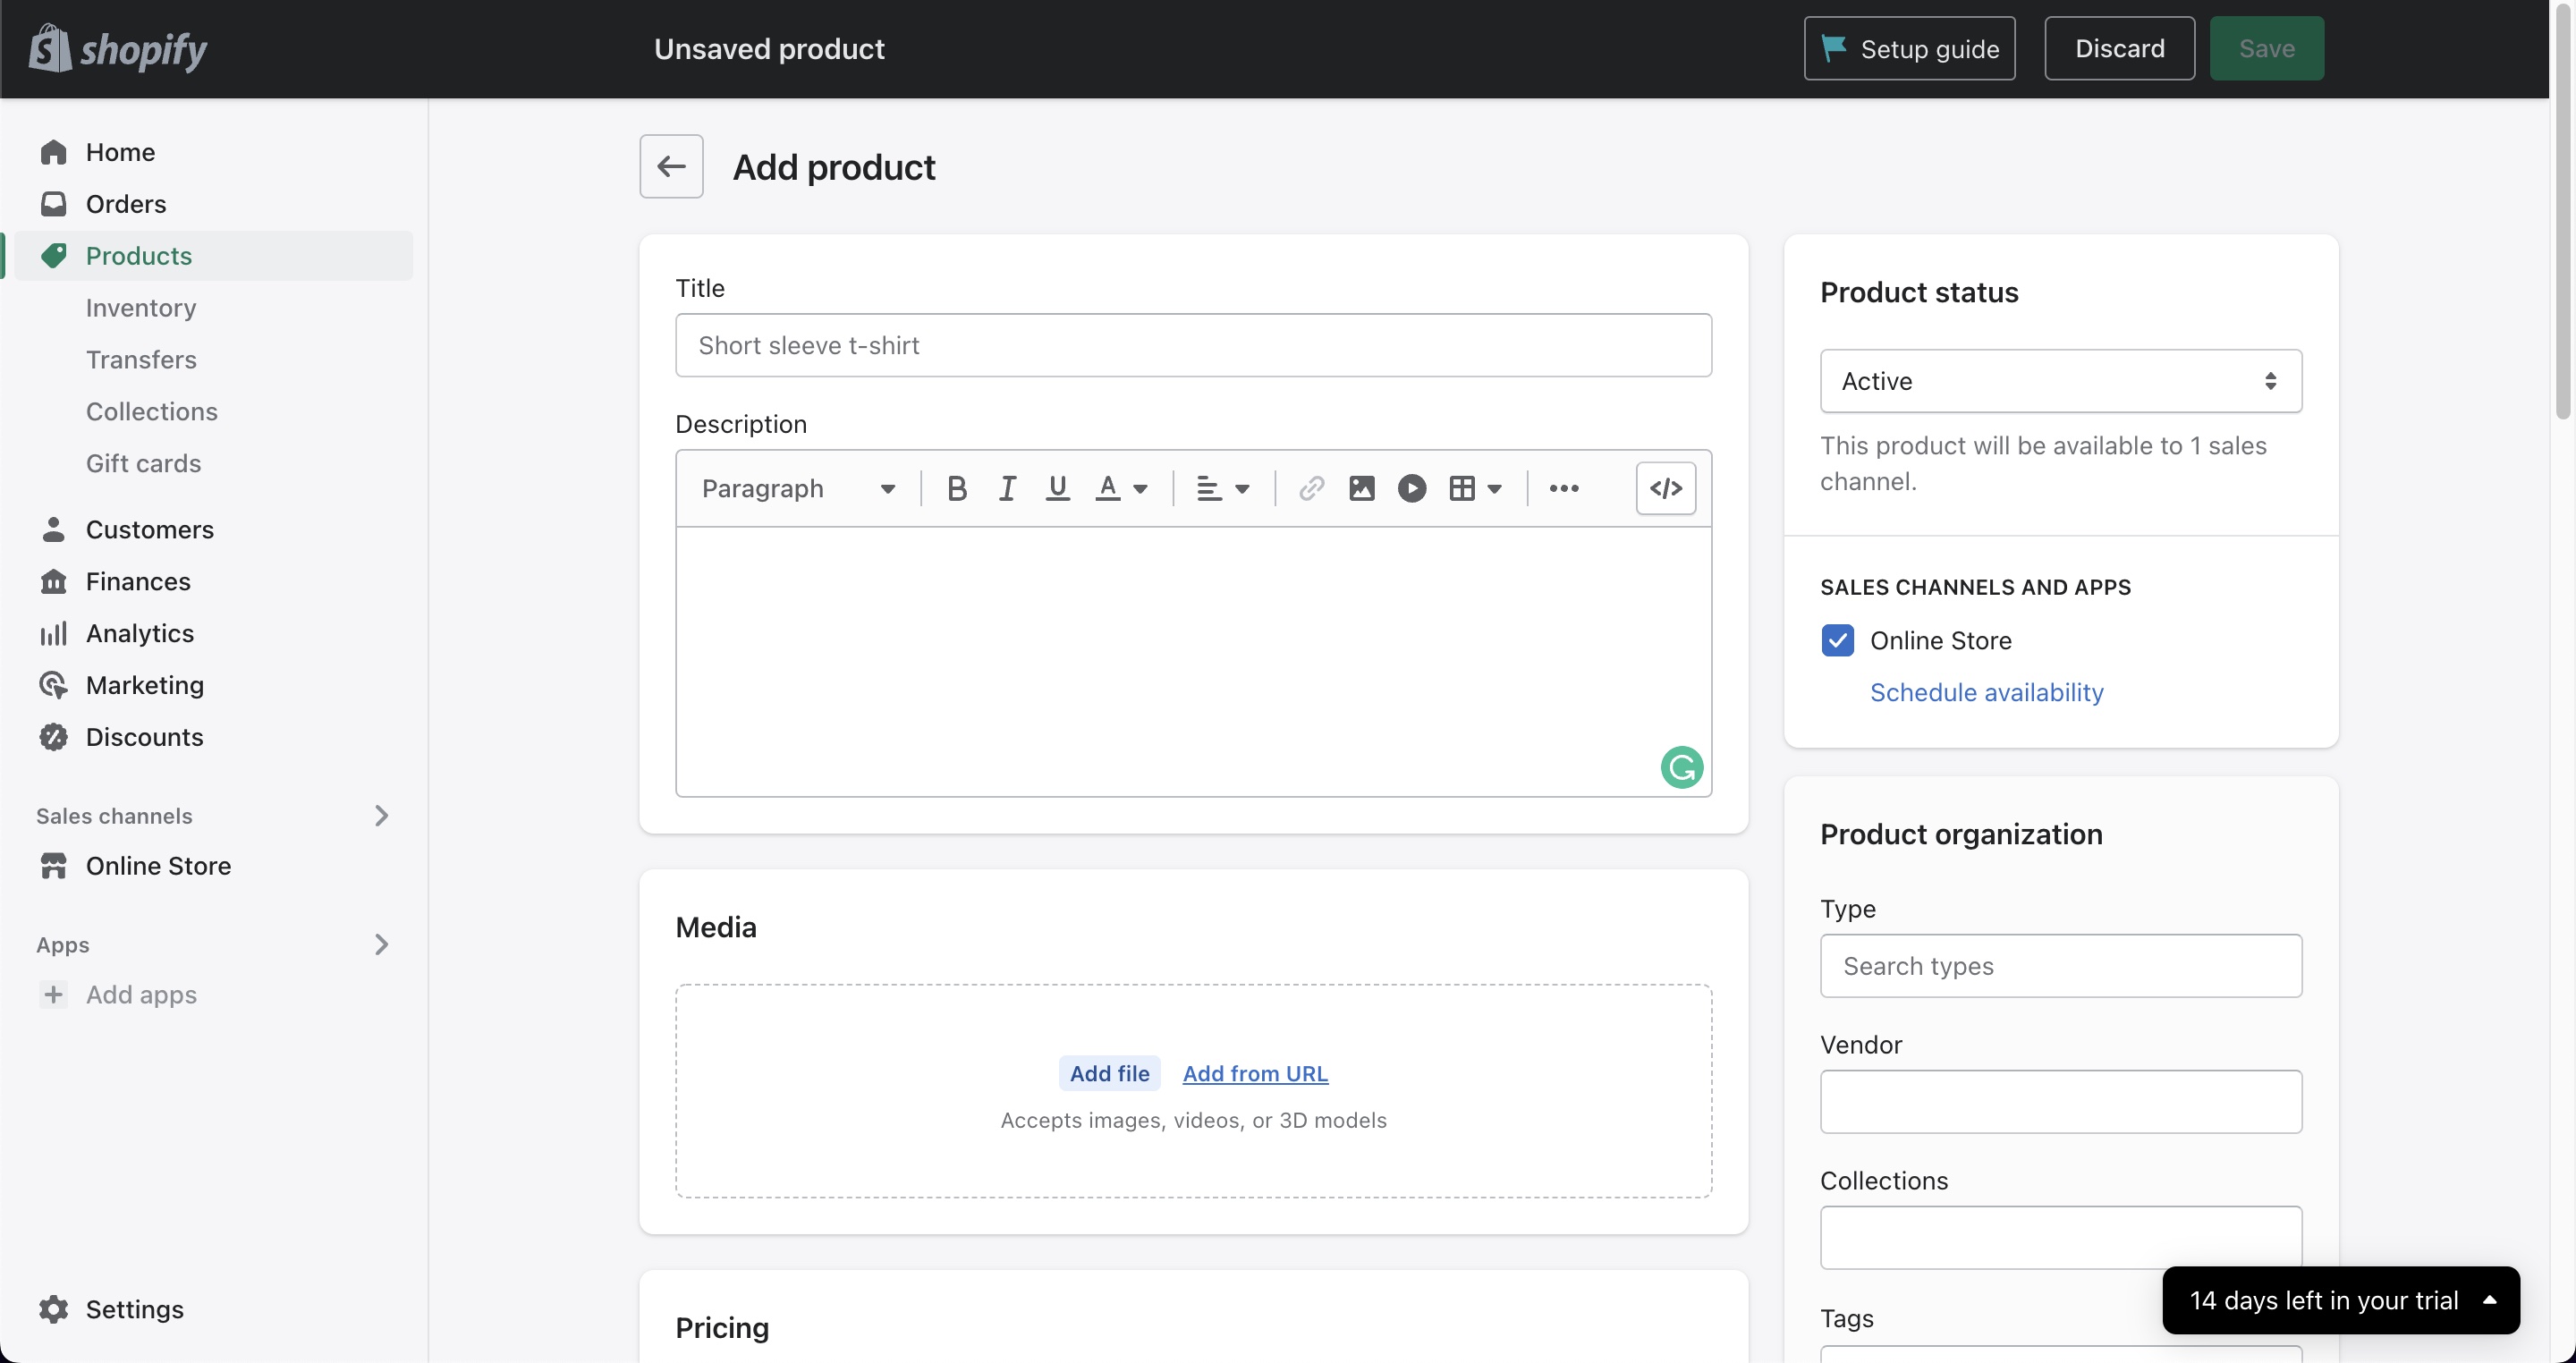
At first, I recommend adding between one and four products so you can get familiar with the system and make the theme customization and testing easier. You can always go back later and add your full product range and categories.
Customizing your theme
Once you've added a few products, head over to "Online Store" and then select "Themes".
Over there, you can scroll down and explore their selection of themes. A lot of them are free to use, but they do offer premium themes as well. Choose a theme that suits the product type that you plan on selling. If you click on the themes, they all offer a demo website to give you a more realistic understanding of what that theme may look like.
After you've chosen your desired theme, you'll be redirected back to your theme customization page. When there, click on "Customize". Keep in mind that you can always go back and change your theme if you're unhappy with the one you've chosen.
You can navigate and rearrange the theme with the left sidebar. If you hover over any element of it, it'll reveal a dotted emblem that lets you drag and drop it where you want on the page. You can also click on any element to get more options on its customization. Also, you can remove and add blocks and columns to your shop.
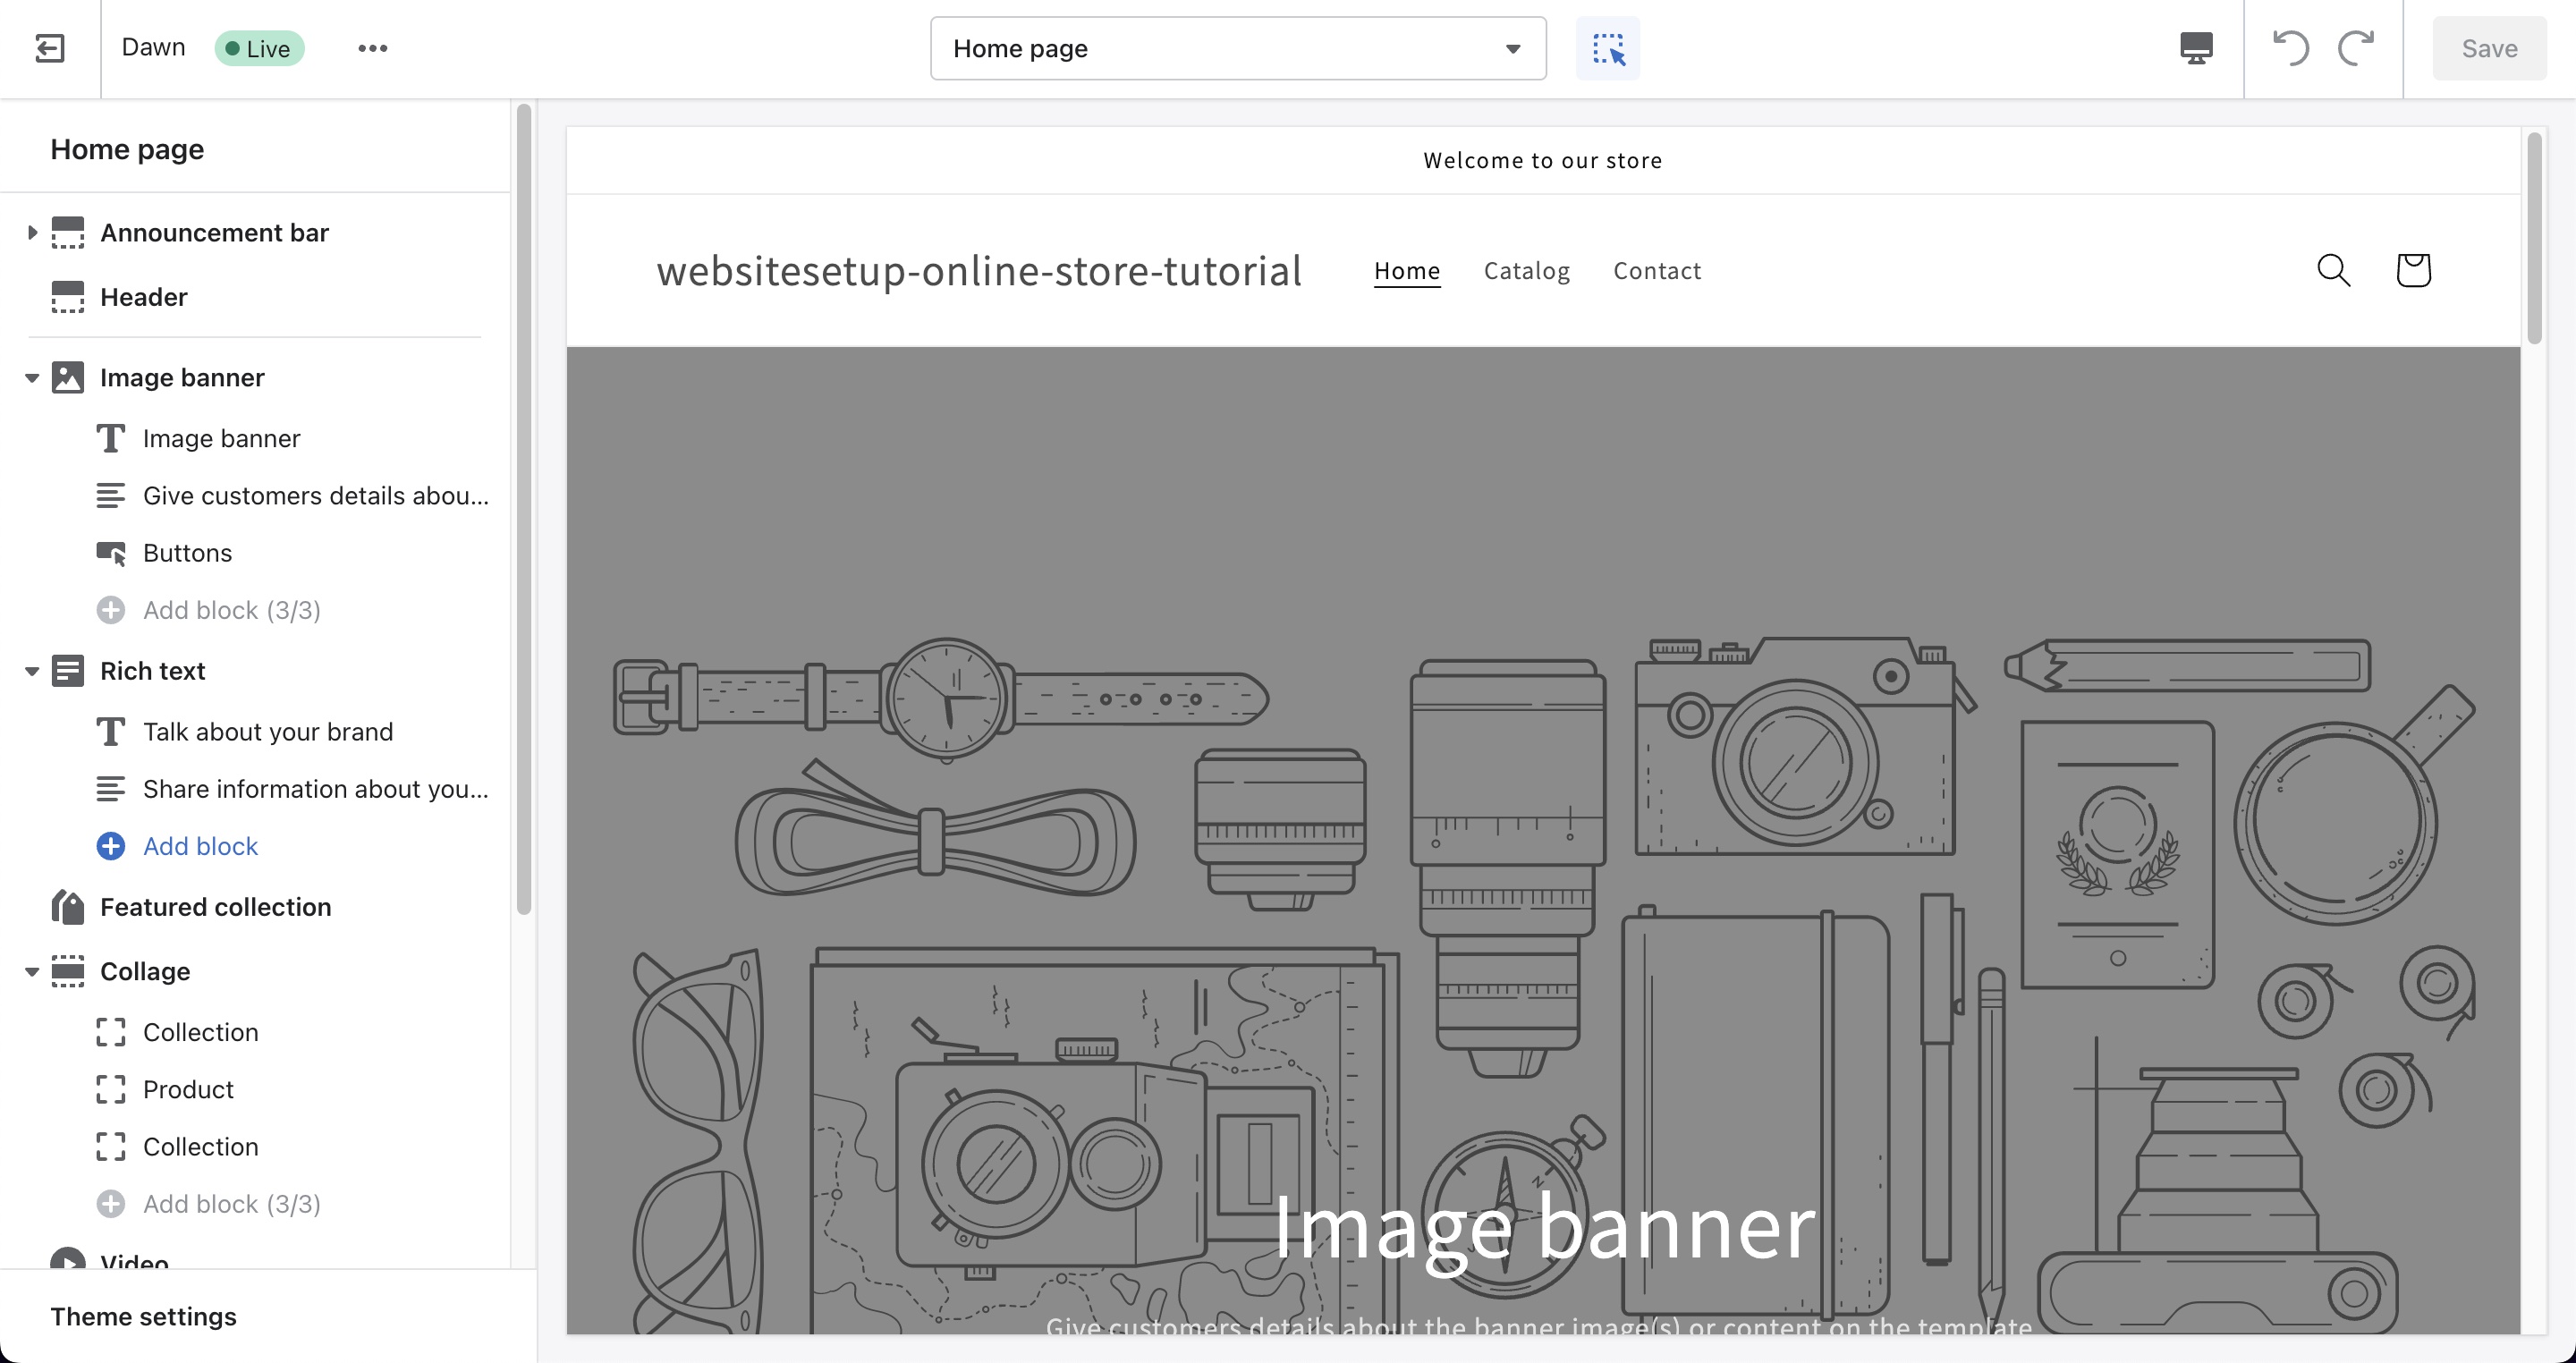
In the bottom right corner, you can also change the theme settings; these include options such as:
- Colors
- Typography
- Layout
- Buttons
- Icons
- Social media.
Adding a custom domain name
As with most hosting or website building providers, your domain name isn't covered in the subscription price. Shopify offers two options in order to add your own domain name: either buy one from them for $14.00/year or connect your own domain that you've bought from a different domain partner such as Domain.com or GoDaddy.com. Shopify has also created a detailed guide on how to connect your domain name.
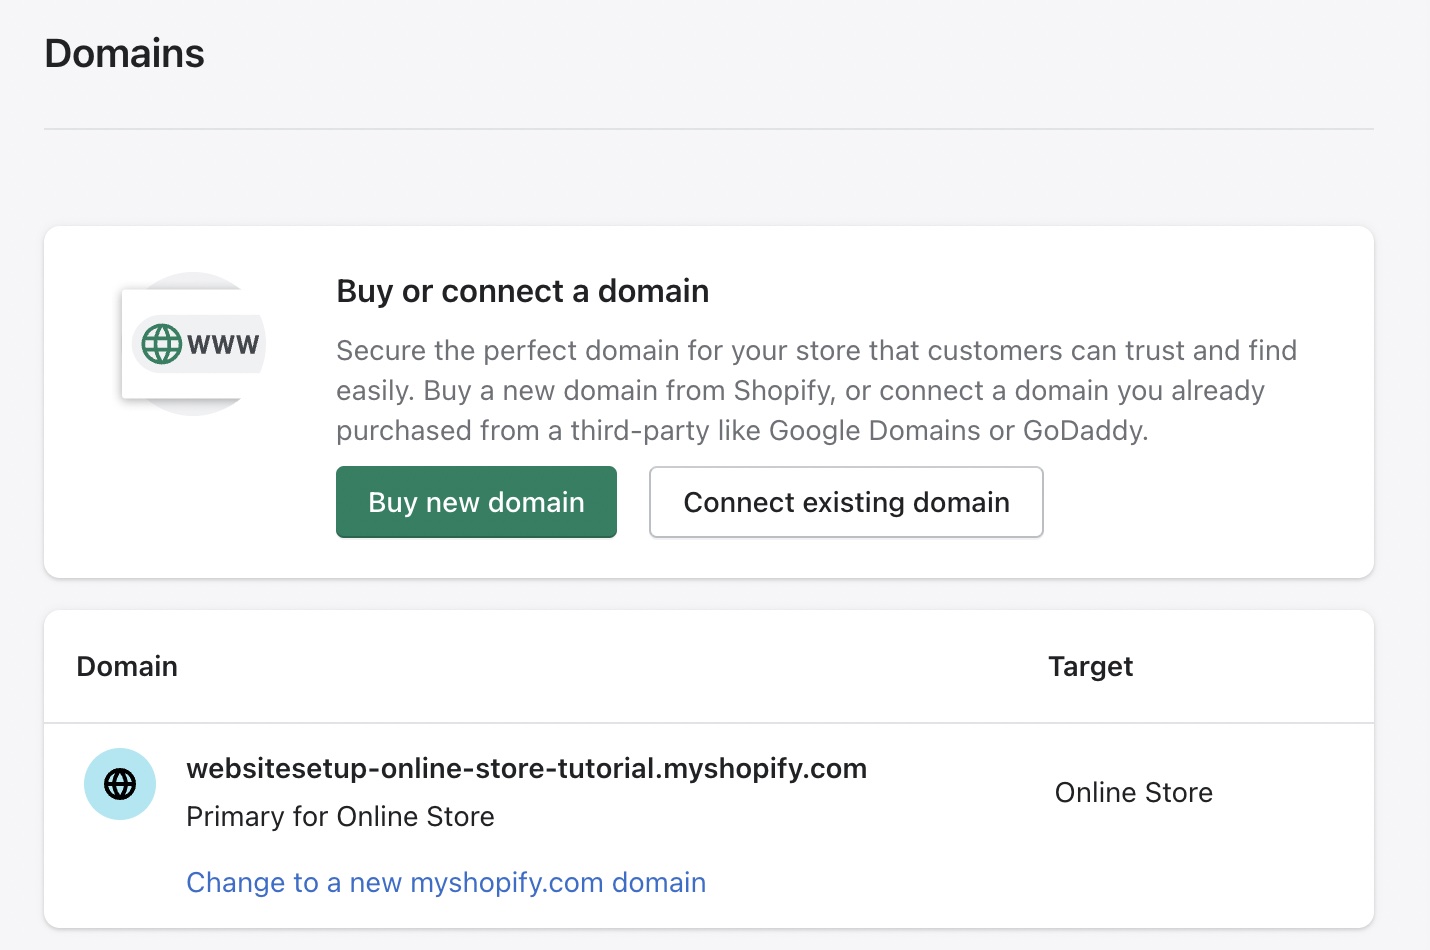
You don't have to add one, but it'll look unprofessional to have a free Shopify domain name with the .myshopify.com in it.
Adding a payment method
Shopify offers a multitude of different payment options:
- Shopify Payments
- PayPal
- Amazon Pay
- Bank deposit
- Cash on delivery.
In total, they have over thirty different options available, each with its own terms and service costs. Shopify Payments has no monthly fees and they accept all major card options, such as Visa, Mastercard, Apple Pay, and Google Pay. Instead of a monthly fee, they charge 2.9% + $0.30 for domestic purchases, and 3.9% + $0.30 for international purchases.

In order to complete the process of adding your payment options, depending on the provider, you need to provide them with your business information and your business payment card.
Placing a test order on your online store
Now, the only thing to do is test out your online store. If you chose Shopify Payments for your payment gateway, then it's easy, since they've incorporated a test mode into it. That means you can buy or test any transaction on your store without having to actually buy it and go back and cancel. They have a great support article on the topic which also features videos on how to test it properly.
Add the most important pages, content, and customization
By now, you should've set up a WordPress (or Shopify) site.
The foundation of your site has been built; now it's time to really start building it out.
The first step is to build out the pages that you're going to need the most. I'll throw in the most popular pages that most websites have, so you can pick out the ones that you will add as well:
- Homepage
- About us
- Contact us
- Our services/products
- Blog
- Hire us
- Privacy policy
- Gallery
- Testimonials/reviews.
If you're unsure what your website should include, read this article about the 12 critical elements that every website needs.
Once you've decided which pages you need, it's time to start adding them to your website and set up your website navigation.
A blank website without any pages or content isn't much use to anybody, so in order to make the website accessible and interesting, we need to add some pages and blog posts. There are pages that most websites need, such as a homepage, services, about us, contact us, and blog among many others.
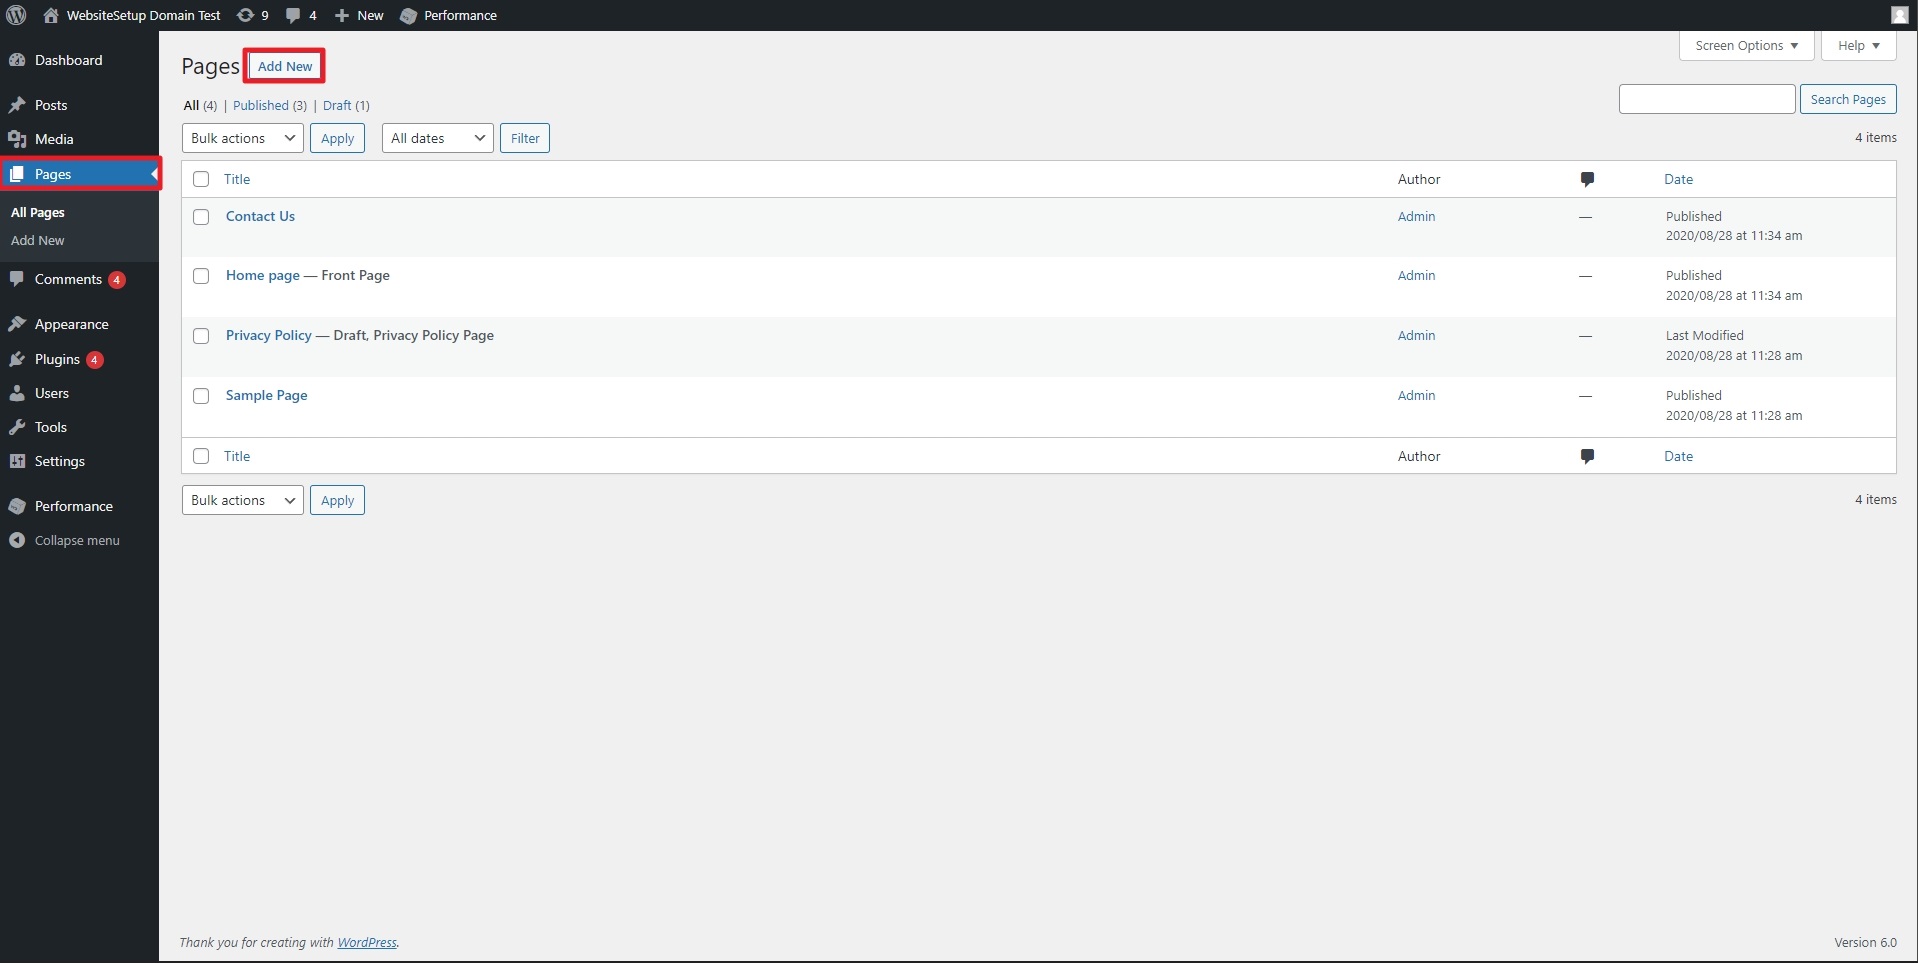
How to add pages and content to WordPress
In order to add pages to WordPress, you need to navigate from the left-hand menu to "Pages" and from there click the button "Add New".
This will take you to the WordPress block editor which is also called Gutenberg Editor. If it's your first time visiting this, then it will display a quick step-by-step tutorial on how it works and where certain things are. It's quite easy to work; everything is block-based, which means if you want to add something to your page, you just need to choose the correct block from the menu and fill it in.
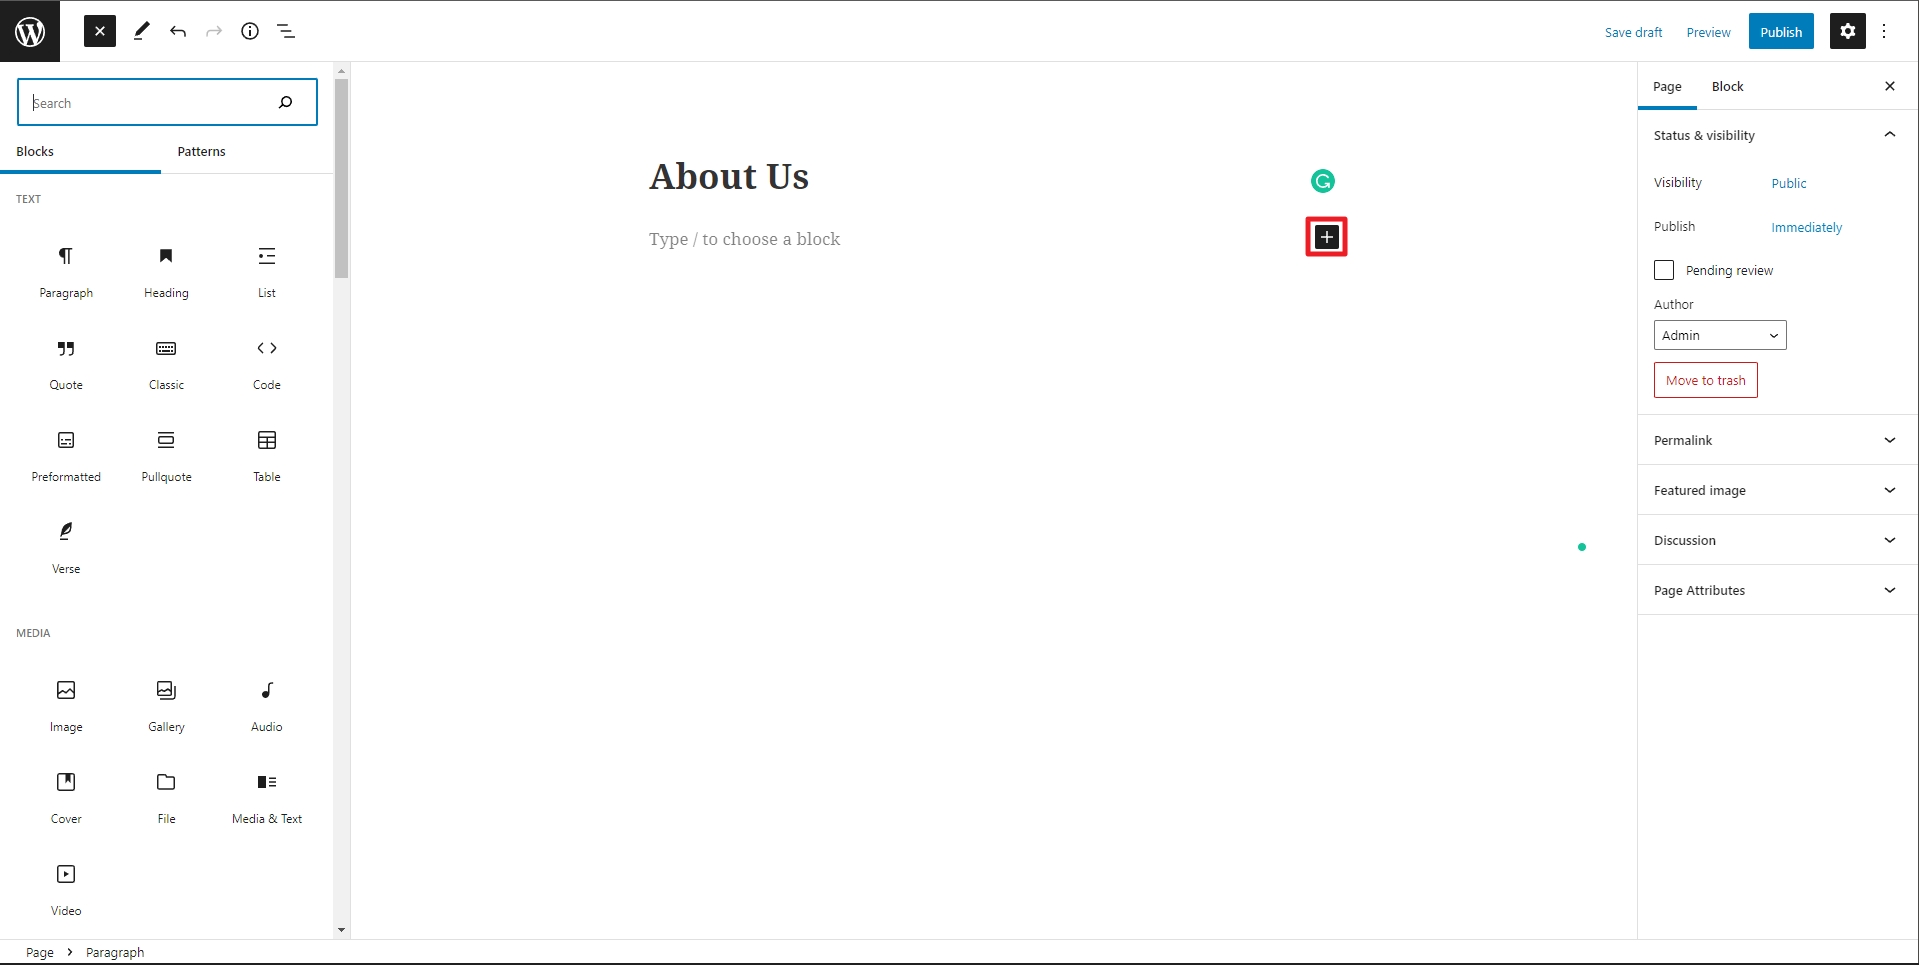
On the left, in the content block section, there are multiple content blocks to choose from. Each serves a different purpose and adds a different element to that page.
And on the right-hand menu, you can change some page-wide settings like the author, what the permalink (URL) is, the featured image, and more. Or on the top, you can click on the "Block" tab and open up the block settings for any block that you've selected on the page.
Once you're happy with the page, you can either choose to make it public, which will make that visible to any visitor, or you can choose to make it private, which means that it's only visible when you're logged in to your WordPress account. This is a great option if you're not yet finished with that page. There's also an option to preview the changes you've made or to publish that page at a certain date and time.
How to organize the navigation menu
Now that you've created the pages, you need time to add them to the navigation bar. This is the bar that is located on top of your website where your visitors can get access to the rest of the content on your website.
In order to change that, you need to go from the left-hand menu to "Appearance" followed by "Menus". Now it's time to create your first menu. The name of the menu doesn't matter since this is only visible to you; so name your menu and then make sure you check the box where it says that this is your primary menu. After you've created the menu, it's time to add pages there.

You can also create sub-items, which means that these pages are revealed when a user hovers their cursor over it. For example, here, I've done that by adding "About Us" and "Contact Us" under the "About" category.
Customizing website
For customizing your site, go to your WordPress dashboard and choose "Appearance" from the left-hand menu. You can tweak your website's theme from there, add and change widgets, customize your menu's structure, and so on. Basically, every change that you want to make with your website can be done under the "Appearance" tab.
Also, if you feel comfortable with code, you can add custom CSS and personalize your site even more. You can add custom CSS from the customizer.
Adding blog posts
Adding a blog is optional. Creating one, however, is a good idea if you want to regularly publish fresh content, demonstrate your expertise, and provide additional value to your visitors.
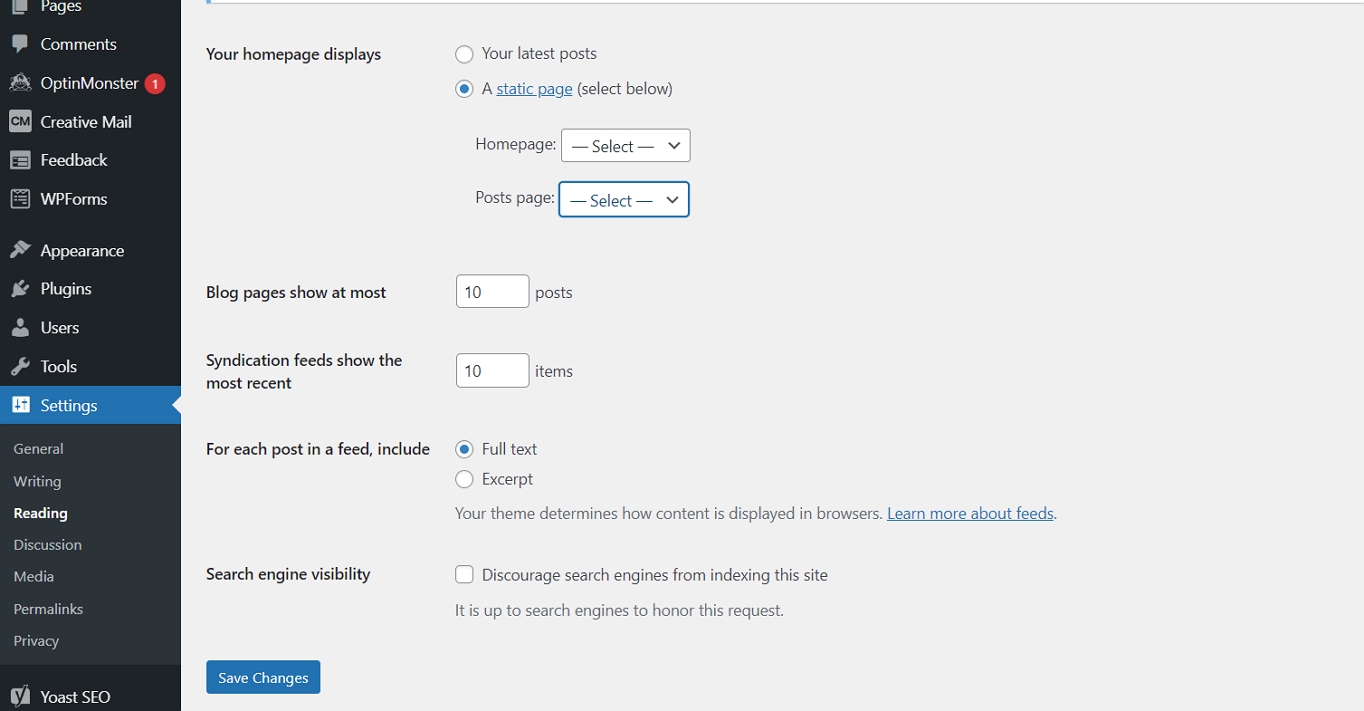
First, it's a good idea to have a dedicated blog page and make your homepage static. To do that, set up an empty page (Pages -> Add New), name it " Blog" (or whatever you want but"Blog" makes sense because it will automatically create the address: yoursite.com/blog), and publish it. Then, pick it as your"Posts Page" either underAppearance -> Customize -> Homepage Settings or underSettings -> Reading.
Your chosen page will automatically display all blog posts when you save them. Be sure to include them in your navigation menu.
Once this is done, you can start creating your blog posts. This can be done via "Posts" and "Add New".
After you click "Add New", you'll be redirected to the editor page where you can start creating your post. Add a title, content, images, and anything else needed for the blog post. In the sidebar on the right, you'll also find options to apply categories and tags, define an excerpt, and set up a featured image.
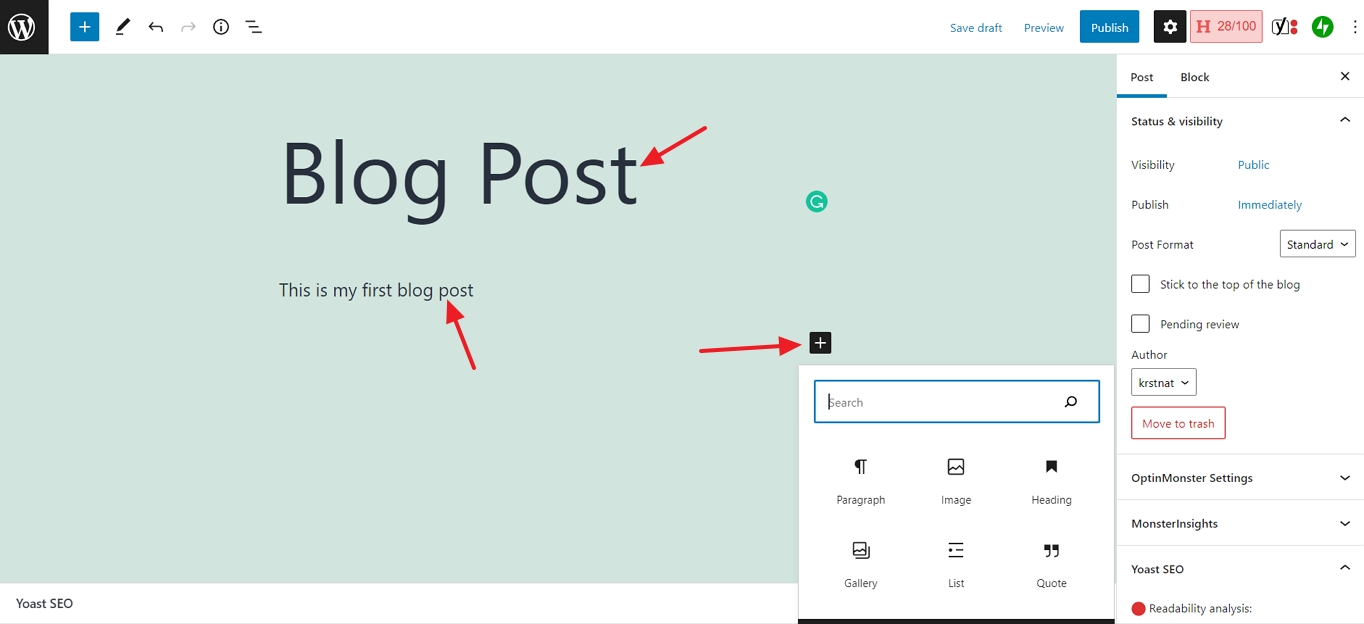
Once you're done, click on "Publish" and your post will appear under the dedicated blog page.
There are certain pages that every website needs to have; the same goes for every online store. Pages such as homepage, contact us, about us, blog and the store page.
Depending on the theme that you've chosen, there may already be some of these pages made for you. In order to check what pages you already have, you need to head from the sidebar to "Online Store", and under that will be "Pages". Most themes already come with a homepage, catalog page, and contact page. You still need to fill in all your own content and customization.
Adding pages to your store
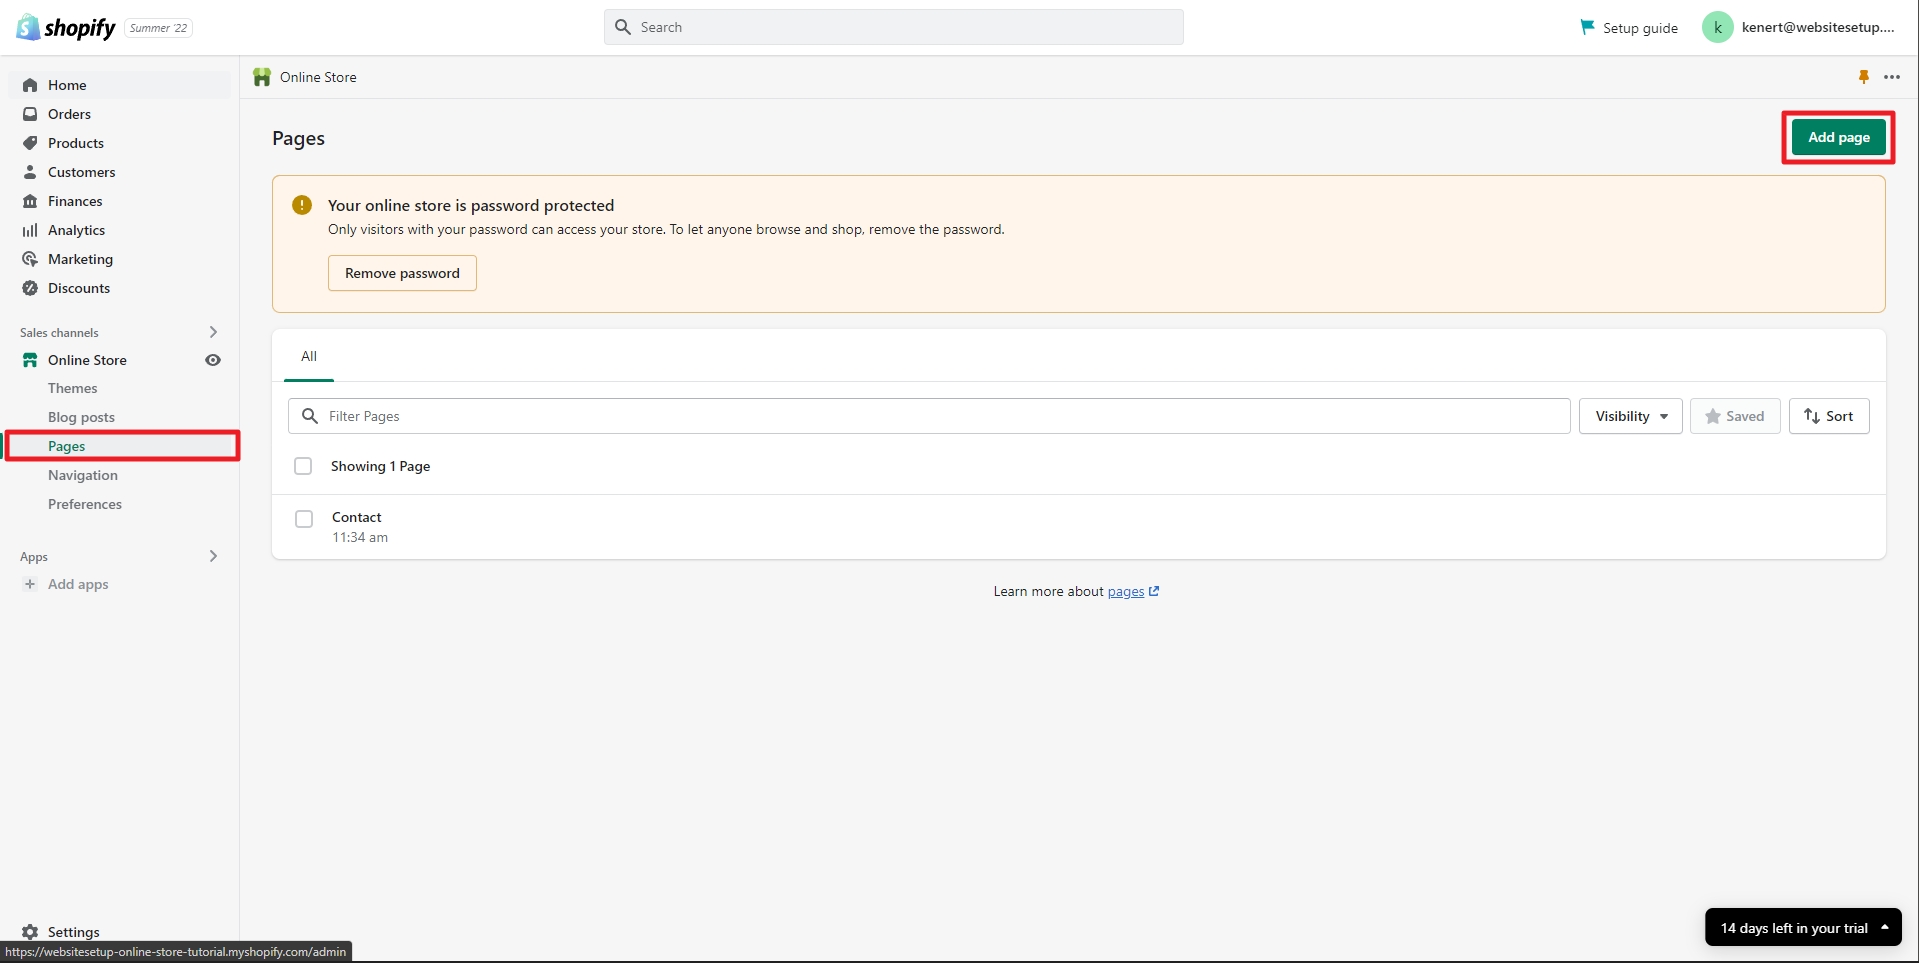
In order to add new pages, you need to head to the "Pages" section in the left-hand menu.
Over there, simply click on the green button towards the top right of the screen titled "Add page".
Once there, you need to add your page title and description. You can also edit that page's SEO title and meta description. SEO titles and meta descriptions dictate how your page will look in search engines such as Google, so it's important to keep it relatively short and concise to best describe what this page is about.
Now create all the pages that you need. Don't worry about editing and customizing the pages yet; that will come in a few steps.
Adding pages to the navigation bar
After you've created all the pages that you need, go to "Navigation" in the left-hand menu. Under there, you'll find a section called "Menus", which refers to the part that sits on top of the website where visitors can see which pages you have or navigate around your website.
There are two different types of menus that you need:
- The main menu, which sits at the top of the website
- Footer menu, which sits at the bottom of the website.
Go through both of these menus and add all the pages that you'd like to be visible to your visitors.
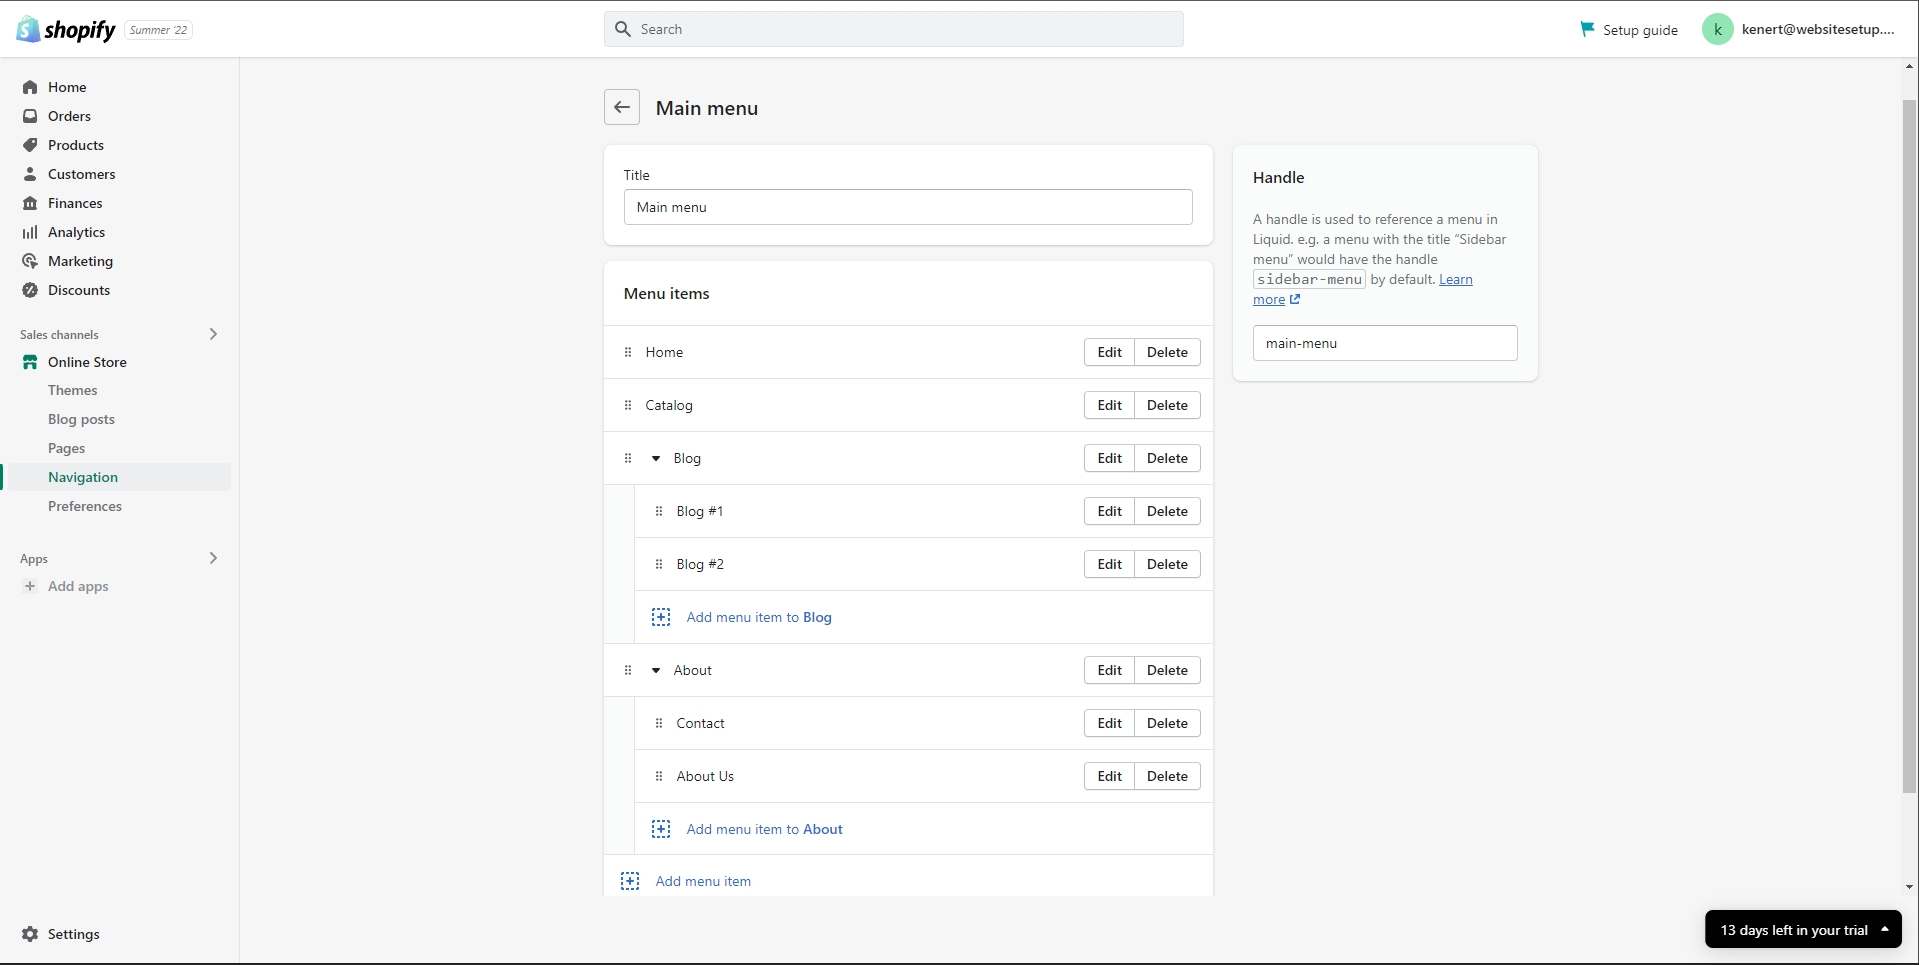
Keep in mind a nifty trick to better organize your website: create category pages. These are pages which gather all related content under one page and help keep your menu simple and understandable, while still keeping all of your content easy to digest. For example, here I've moved the blog posts under the "Blog" category and the about us and the contact page under "About".
Customizing content
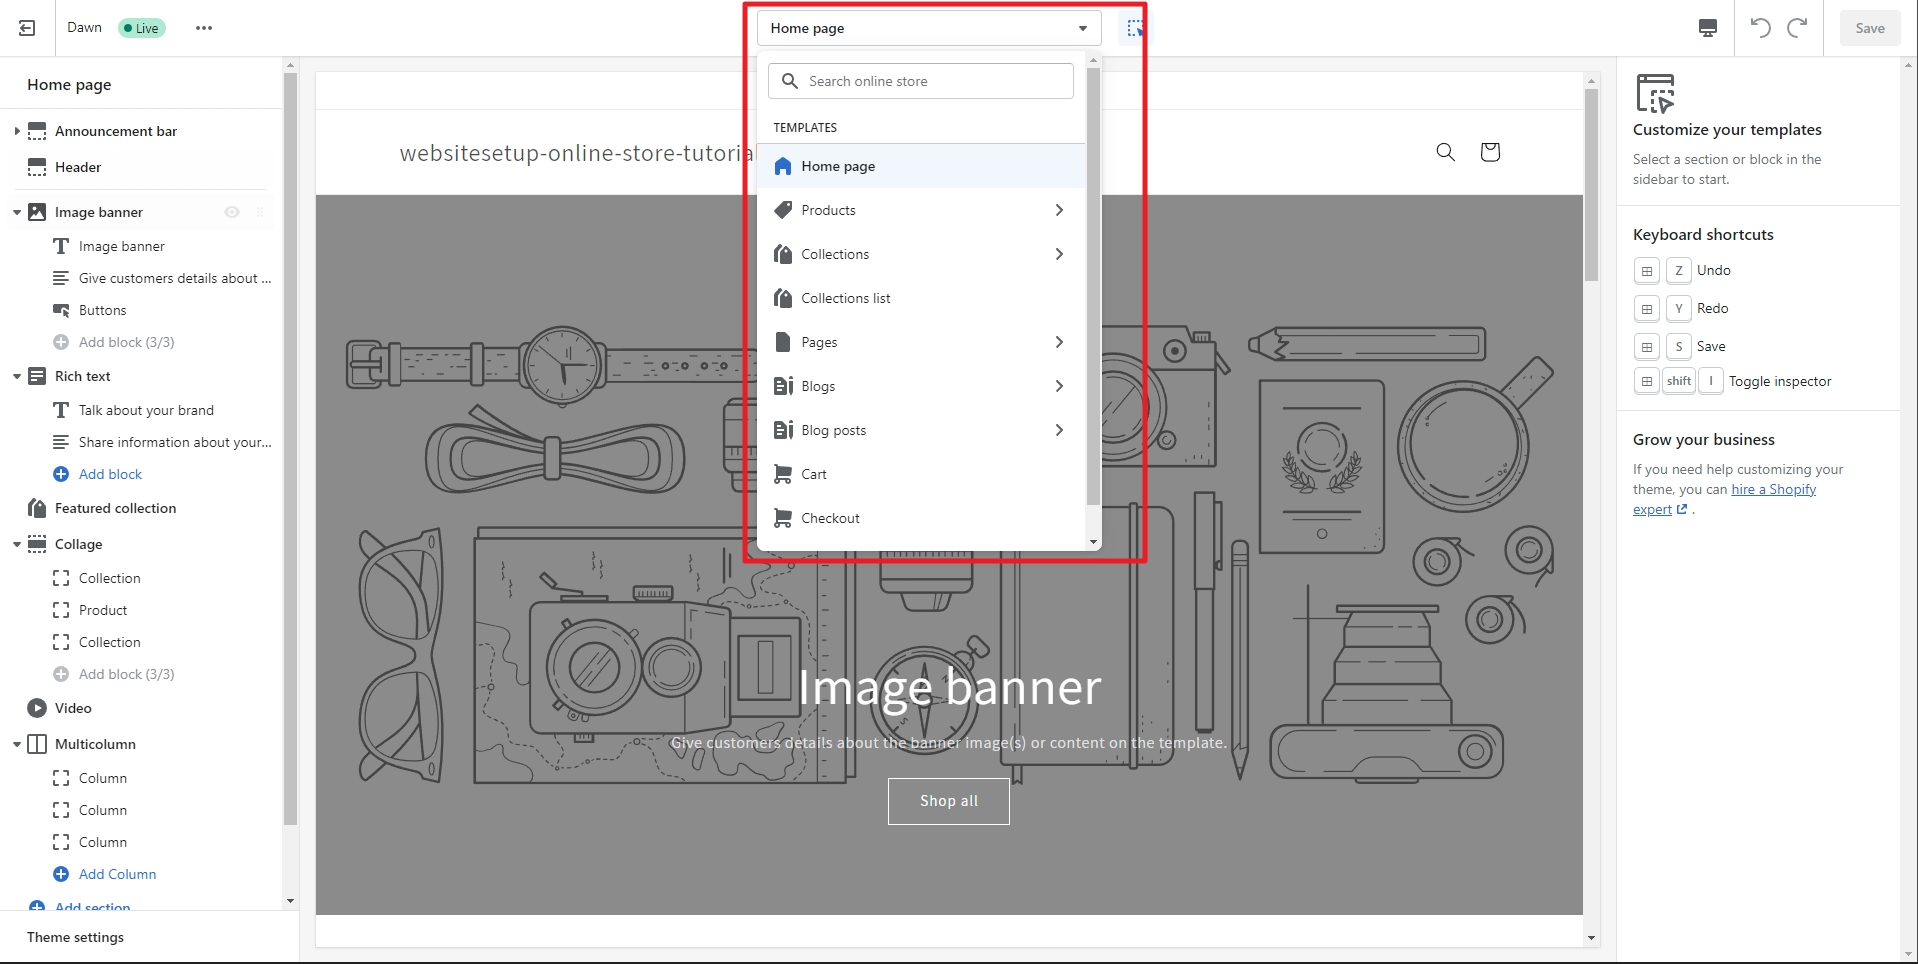
To customize your pages, you need to go from the left-hand menu to "Themes" and then " Customize". This brings up the Shopify website editor.
In order to choose which page you want to edit, you can do so by clicking on the top at the center of the editor. This will open up a search bar where you can choose the page you want to add content, customize, or edit.
There are lots of different options for customization. They differ from theme to theme, but most of the basics remain the same, no matter which theme you select.
On the left-hand menu, you can choose the order of the content and which blocks or columns you'd like to have. And once you click on any of them, a right-hand menu will appear where you can choose additional options just for that block or column. It may seem a bit daunting at first, but it's actually very intuitive once you learn the basics of it.
Also don't forget to check out "Theme options" in the bottom left corner. Over there, you can do site-wide edits such as colors, typography, and much more.
Adding blog posts
In order to add a blog post, you first need to create a blog page where you can display all of your blog posts. You can do so by following the aforementioned way of creating pages.
To create a blog post, you need to go from the left-hand menu to "Blog posts" followed by the green button on the top right titled "Add blog post".
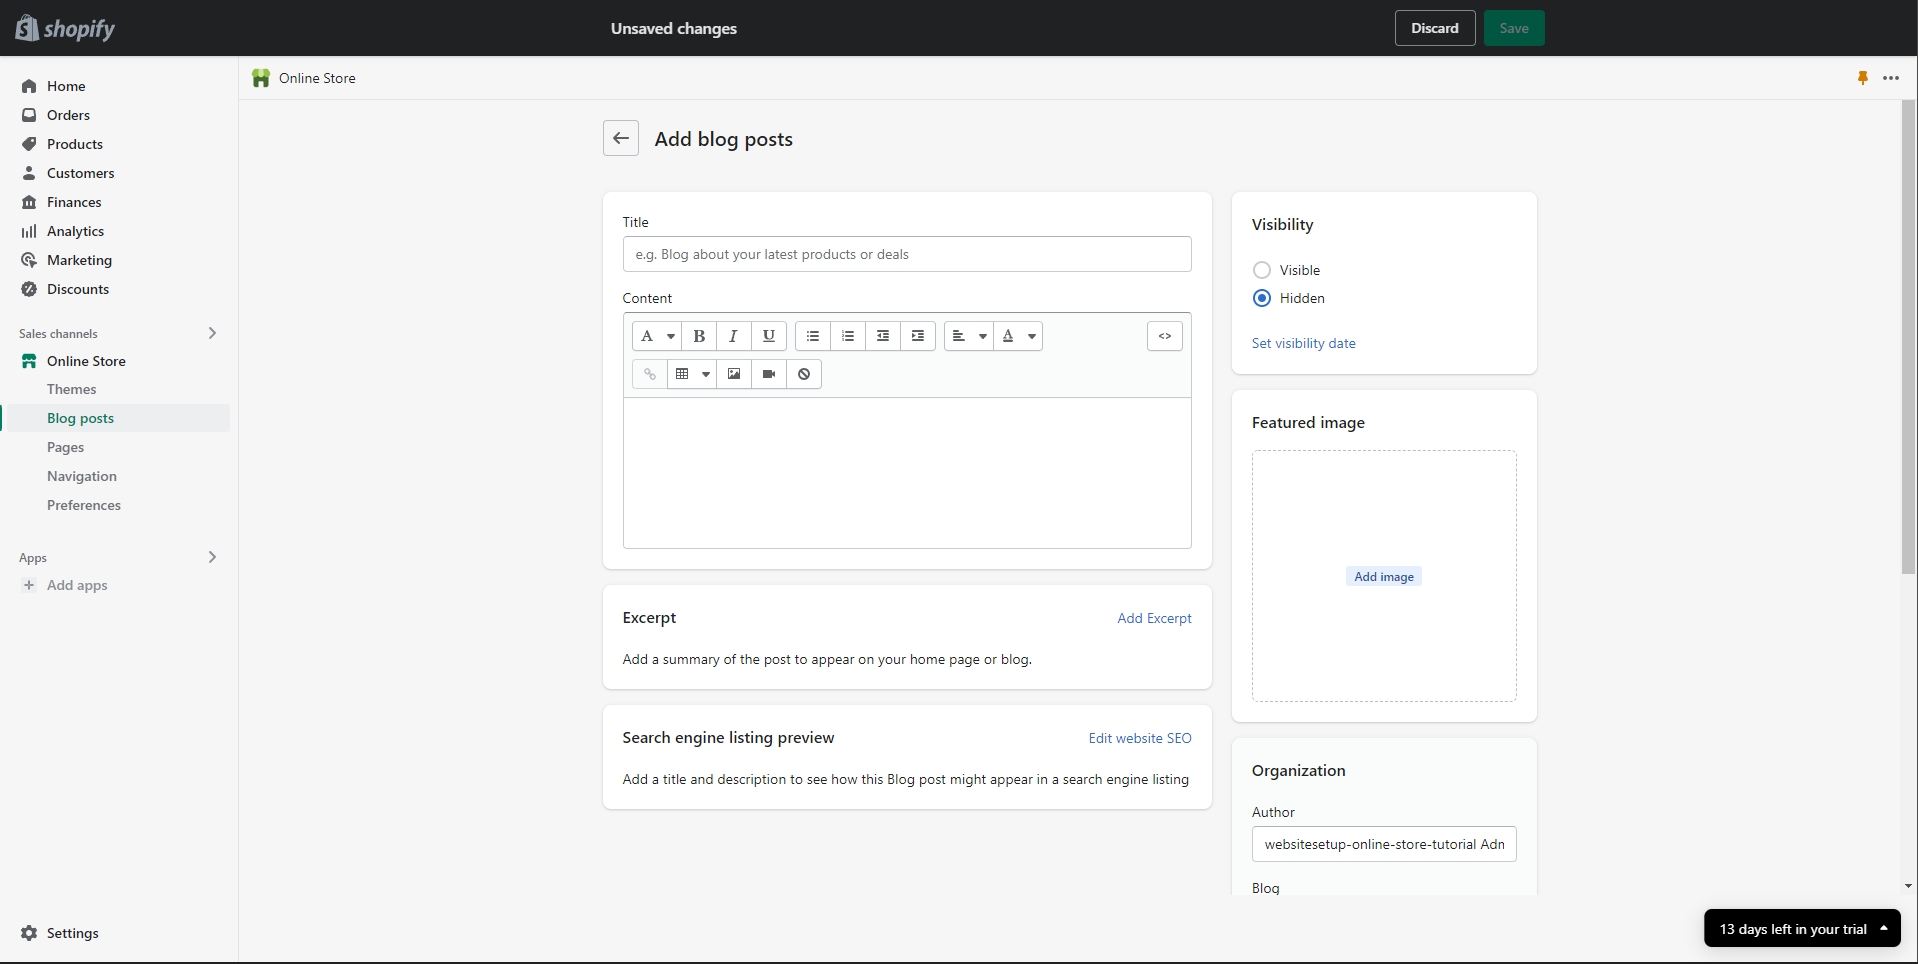
Adding a blog post is a bit different to adding a page. The main difference lies in where you edit the content of the page. With blog posts, you write and add your blog's content right inside of this editor instead of doing so in the theme customization area. You can still do some additional visual customization in the themes area, but you can't change the content itself over there.
Fine-tune, test, and launch
Now that you've added the content and pages you need, it's time to start preparing for the launch.
We've listed 30+ things you should check before launching a website, but some of the suggestions aren't always necessary for WordPress and Shopify users. But it wouldn't hurt to double-check.
In order to make sure that everything works as expected, be sure to do the following:
- Browse all your pages one by one, and make sure all the links and pages are working
- Proofread your content and copy
- Check your website on mobile devices
- Make sure your SSL (https) certificate works
- Create social media accounts (if you don't have them already).
Source: https://websitesetup.org/
Post a Comment for "Easy Completly Free Way to Make a Website"